

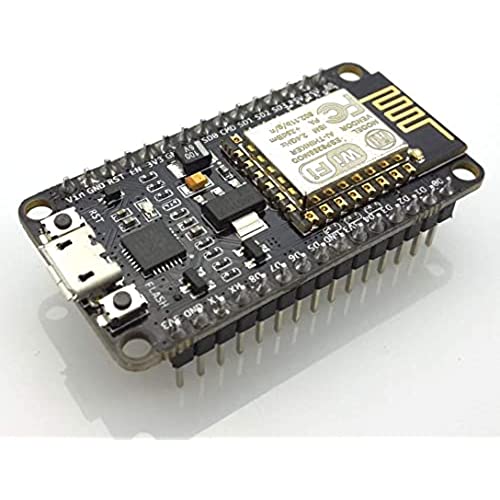

HiLetgo 1PC ESP8266 NodeMCU CP2102 ESP-12E Development Board Open Source Serial Module Works Great for Arduino IDE/Micropython (Small)
-

Quincy Acklen
> 24 hourSo for me when setting this up with the Arduino IDE (that is - not using Lua or ESplorer) I had to select NodeMCU 0.9 (ESP-12 Module) from the board list ( after loading ESP boards via the addition board manager URLS - [...]). If I selected the NodeMCU 1.0 (ESP-12E Module) I was able to upload just fine, and I could even bump the baud rate up to 921600 upload without error (much faster btw). But I couldnt even get blink to run with the 12E selected. I tried a bunch of things, and as usual the last thing I tried worked. Selecting NodeMCU 0.9 (ESP-12 Module) with a baud rate of 115200 ( after selecting the right port after opening the device manager and unistalling the conflict on the port then reconnecting and then updating the driver ). So it might not be straight forward to get it going out of the box, mostly the usual driver/COM Port/ Baud Rate stuff youre used to with arduino. It was the fact that I thought I was buying a 12E and arduino works with 12. And apparent the Lua firmware is already at version 1.5+ so an update may be in order if youre into that.
-
sonicguru
> 24 hourstill trying to find good forum support on this product it has significant onboard capabilities but limited libraries available.
-
Portland Ben
> 24 hourI couldnt get my PC to recognize it after hours of trying all the tutorials other users here have posted. The other one I bought for my little brother worked fine. Back to the default micropython board and arduinos for me. 2 stars since my brothers did work.
-
honest review
> 24 hourcouldn’t flash one, not sure if it was my fault or not
-
Muhammad Ghunaim
> 24 hoursmall one for big work.
-
Rasmi
> 24 hourMAC USER DO NOT BUY IT. IT DOES NOT WORK WITH MAC. YOU MIGHT INSTALL SILICON LABS USB DRIVER BUT STILL, IT FAILS TO GET DETECTED>
-
Joe Millington
> 24 hourDOA. After some delay, HiLetGo fully refunded my purchase amount. Five Stars indicate their willingness to make things right, which they did. Thank you!
-
Zachary Jacobi
> 24 hourGreat product and seller was working hard to resolve mail isue
-
Jayme W.
> 24 hourWorks great except power in through pins. Heats up the voltage regulator but doesnt power on. Works on usb. Makes it useless for my application.
-
AperturePriority
> 24 hourThe HiLetgo ESP8266 NodeMCU CP2102 ESP-12E Development Board is a great choice for people who are already familiar with the Arduino IDE. Setting up the ESP8266 NodeMCU with the Arduino IDE requires just a few steps and is well documented on the internet. From that point, configuring a sketch is similar to many Arduino devices. This is an excellent board for IOT, remote control, etc. The quality of the module is clean and it works well. One negative is that there is only a single analog pin (ADC0). Be aware that this is a 3.3 volt device. There is one 5 volt pin (Vin) that supplies the input of an onboard 3.3 volt regulator chip. Likewise, 5 volts can be supplied via the USB connection. All GPIO pin levels, however, should never exceed 3.3 volts. For people using the ESP8266 NodeMCU CP2102 ESP-12E Development Board for the first time, there is a short learning curve. However this is an amazing package for the money.


