
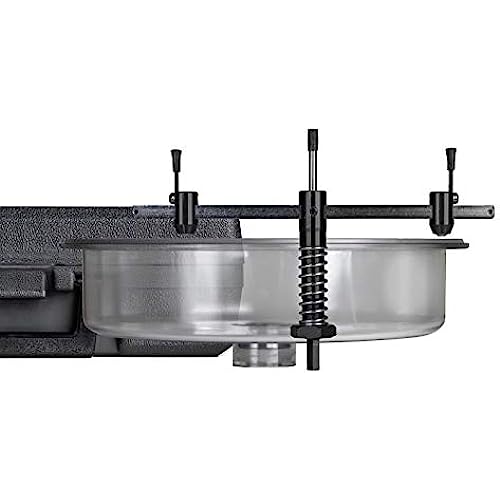
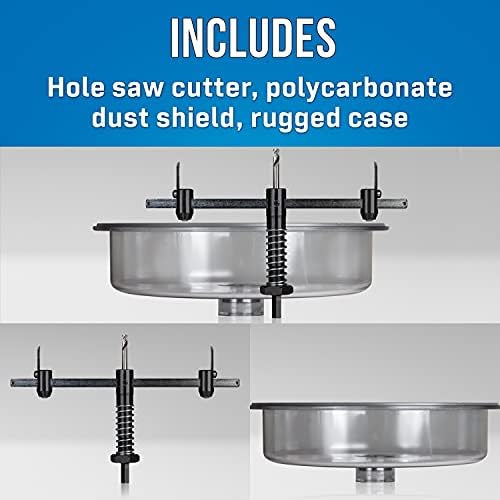


Jonard Tools AHC-10, Professional Grade Round Hole Saw Cutter, Includes Dust Shield and Case, Cuts Plywood Plasterboard Sheetrock Acrylic Up to 1 1/16” Thick, Adjustable Hole Size 2.2” to 10”, Silver
-

Digerati
> 24 hourAnother reviewer said this would not work with an electric drill, I had no problem using this on 5/8 drywall with a Makita 18v drill (though I did have trouble getting regular drill to hold on the shank, I had to use a 90 degree drill with a manual chuck, that worked fine. Also I used two left cutting bits so they would be symmetrical and run in the same groove.
-
KD9BWI
> 24 hourWorked great for cutting in supply diffusers on drywall. I decided on a new construction job to try its claimed ability to cut plywood/osb. The trick with drywall was to go slow with a fast drill speed to keep the teeth from jamming. I did the same thing on OSB, it tried to cut but ended up snagging and breaking the pilot bit before the drills anti-kickback could do its thing. The saw is also VERY particular about keeping COMPLETELY or else its try to skip.
-
Troy Lemons
> 24 hourThis is one of the best tools I’ve purchased It does exactly what it’s made for Cuts perfect holes and you have no dust flying around It’s easy to clean up and the carrying case is very nice and sturdy
-
HiVac
> 24 hourI don’t understand all the “it doesn’t work with a cordless drill” comments. It works just fine! I cut four holes in my ceiling in about 5 minutes for surround speakers (I chose this model because the Sonos architectural speakers require an 8-1/4” cutout). And it worked perfectly with my dewalt 20v cordless drill. You need to spin it fast and cut slowly (maybe 10 seconds in drywall)...but there is no mess, and the hole is perfect! Highly recommend this tool!
-
Francesco
> 24 hourThis is a well-made accessory. Yes, you’ll need a drill with adequate torque, but what handyperson or tradie who’d spend $80+ on this hole saw doesn’t own a modern cordless drill with gobs of torque? My non-Fuel 18V Milwaukee had zero trouble with it. A side handle would definitely help stabilizing it, but I still had no issues. My only beef is that what seemed like the logical way to set the size — on the flat (outside) of the blade — is in fact wrong; you have to slide the blade holder *past* the measurement and line up the curve of the holder with the marking on the beam. Easy enough to see the wrong size on a smaller hole, but setting for an 8¼” diameter for my first try it wasn’t noticeable until I finished the cut. Now waiting for the mud to dry after putting the plug back in the wall (because it’s the only way I’ll be able to re-cut it)! I saw the error and adjusted the tool and cut three other holes in around five minutes. I have another couple of dozen holes to cut here and at another property. Oh. And really pay attention to the location of studs, blocks or furring strips/joists in the cavities you’re trying to hole. The blade will bind and the drill will buck in the blink of an eye! That first hole taught me *two* lessons, there was a block where none were expected. Overall an incredibly useful addition to my tool box.
-
Eddie Meinhardt
> 24 hourSuper useful, being able to cut into sheet rock without doing a mess is priceless. Totally recommended!
-
Dr. Q
> 24 hourThere was no mess/dust after drilling a hole in the ceiling.
-
BigE
> 24 hourI think I know why some of you had a miserable time using this tool. Mine came with one of the cutters facing the wrong way! The instructions dont make this clear, but as an experienced machinist I understand carbide cutting tools. The flat carbide surface must face the direction of the cut. If you lay the cutter arbor assembly in front of you on a surface, with the the drill tip pointing away from you, one of the carbide tools will be on the left, the other on the right. For clockwise drill rotation, the cutter on the left should have the flat carbide surface facing up. The left one should be facing down. That way as the assembly rotates, both cutters are engaging the material in face-first orientation. (See my first photo and visualize it rotating clockwise with the drill.) Mine came with both cutters facing up. One cutter would have just dragged through. I guess the Chinese assemblers werent trained. Also, for optimal cutting, the sharp corner of the cutting tool should be outermost, as in my second photo. But two of mine came with the opposite orientation, as shown in my third photo. Perhaps their intent was to use one of each. That way you would be cutting the inside and outside kerf in unison. Worth a try. The most important thing is to point them in the correct direction, as in my first photo. Otherwise this is an elegant solution to minimizing dusty hole cutting in sheet rock. Nice case. Fits my shop vacuum perfectly. CHECK YOUR DIAMETER SETTING AND TIGHTEN EVERYTHING WELL. Practice on some scrap material if you can, and check the screw tightness every hole.
-
JD Snacker
> 24 hourI purchased this to cut various sized holes in my ceilings for recessed lights and whole-house audio speakers; 50+ holes of various sizes. This is a substantial, heavy duty, super sturdy/rugged tool…. It is not flimsy or “cheap” in construction. Works like a champ and the dust shield really helps contain the drywall dust. The only recommendation I would make for anybody considering this tool is to buy the version with the vacuum port to further mitigate the dust by eliminating the need of dumping it. I did not know a version with a dust port was available when I purchased this.
-
Michael L
> 24 hourFor the price, the quality and machining should have been a little better. It got the job done, and really does keep the mess to a minimum. I do recommend a drill with a side handle. The larger your hole the more difficult to avoid tear out with a standard cordless drill.

