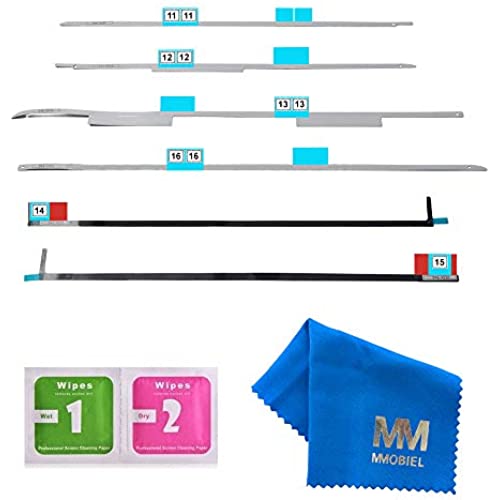
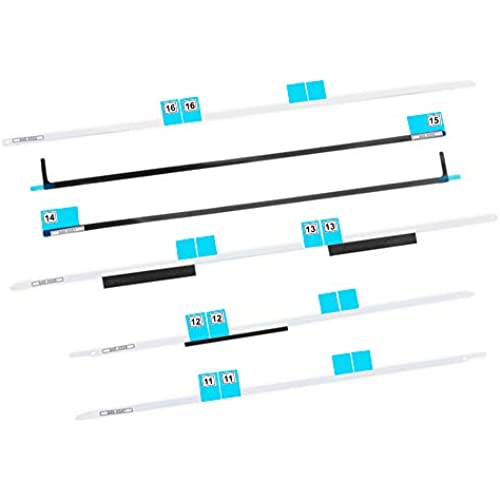
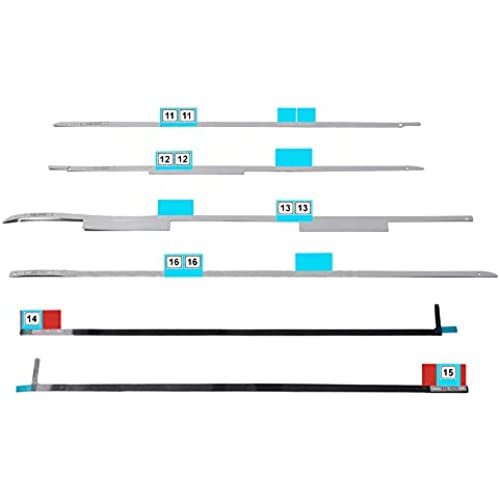
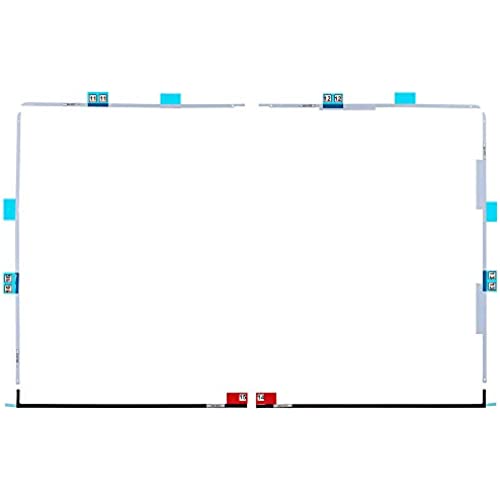
MMOBIEL Replacement LCD Display Adhesive Tape Repair kit Strips Compatible with iMac 27 inches A1419 / 13.2 Late 2012/14.2 Late 2013/15.1 Retina 5K Late 2014 mid 2015/17.1 Retina 5K Late 2015

(1172 Reviews)

Price
$7.00

Quantity
(10000 available )

Total Price
Share
4 Ratings
1
1
2
0
0
Reviews
  • Khang Nguyen

    > 24 hour

    This adhesive tape doesn’t fit iMac 2017 27 inch or mode A1419. The tape will cover the iMac microphone. I had to open it when I realized that the mic doesn’t work. I bought another brand it fits my iMac perfectly.

  • MR CHRISTOPHER PAUL KEWISH

    > 24 hour

    Awaiting to use!

  • Plasmon

    > 24 hour

    I deducted 1 star because it did not come with an instruction. Anyway, its pretty much the same as the other brands that you can find the instruction online and match the numbers with those.

  • RP Computing

    > 24 hour

    Works great for me

  • Compatible with: Apple iMac 27" A1419 iMac13,2 Late 2012, iMac14,2 Late 2013, iMac15,1 Retina 5K Late 2014 mid 2015, iMac17,1 Retina 5K Late 2015
  • Easy to use: Incl. Cleaning Alcohol Pads and Cleaning Cloth to help you to gently remove old Adhesive Glue / Dirt.
  • Please familarize yourself with the process before attempting it yourself: We cannot take any responsibility for damage incurred during the Replacement process. Please check Model type before you begin the process.
  • Assembling: After the display has been taken off , the display cannot be reinstalled tightly because the Sticker is disposable. A new Set of adhesive Sticker Strips is needed to assemble the Display.
  • High quality product by MMOBIEL

WARNING: Before you start placing strips, remove all of the old adhesive from around the perimeter of the rear enclosure.

imac, adhesive strips, apple display repair, imac display repair adhesive, imac adhesive stripsimac, adhesive strips, apple display repair, imac display repair adhesive, imac adhesive strips

imac, adhesive strips, apple display repair, imac display repair adhesive, imac adhesive stripsimac, adhesive strips, apple display repair, imac display repair adhesive, imac adhesive strips

imac, adhesive strips, apple display repair, imac display repair adhesive, imac adhesive stripsimac, adhesive strips, apple display repair, imac display repair adhesive, imac adhesive strips

imac, adhesive strips, apple display repair, imac display repair adhesive, imac adhesive stripsimac, adhesive strips, apple display repair, imac display repair adhesive, imac adhesive strips

Step 1

  • If you are re-using your existing display, remove the old adhesive from the back of the display.
  • Peel off the old strips of adhesive using tweezers or your fingers. Start at the bottom and peel upward towards the top
  • After all the old adhesive is removed, carefully clean the area under the adhesive with 90% (or greater) isopropyl alcohol and a lint-free cloth. Wipe in one direction, not back and forth. of the device.

Step 2

  • Start with strip 13, which goes on the right vertical side of the rear enclosure.
  • Peel the short piece of backing off the back of the strip

Step 3

  • Insert the tip of a spudger into the hole at the top of the strip from the side that still has a backing on it.

Step 4

  • With the spudger still poking through the hole in the adhesive strip, push the spudger tip into the corresponding hole in the frame of the iMac.
  • Using the hole and spudger to anchor the position of the adhesive strip, line the strip up against the right edge, gently pull down against the spudger to ensure the strip is taut, and stick it onto the frame.

imac, adhesive strips, apple display repair, imac display repair adhesive, imac adhesive stripsimac, adhesive strips, apple display repair, imac display repair adhesive, imac adhesive strips

imac, adhesive strips, apple display repair, imac display repair adhesive, imac adhesive stripsimac, adhesive strips, apple display repair, imac display repair adhesive, imac adhesive strips

imac, adhesive strips, apple display repair, imac display repair adhesive, imac adhesive stripsimac, adhesive strips, apple display repair, imac display repair adhesive, imac adhesive strips

imac, adhesive strips, apple display repair, imac display repair adhesive, imac adhesive stripsimac, adhesive strips, apple display repair, imac display repair adhesive, imac adhesive strips

Step 5

  • Once you"re satisfied that the top half of the adhesive strip is neatly aligned, peel the longer piece of backing out from behind the strip.

Step 6

  • Align the lower portion of the strip with the right edge of the frame, and stick it down.

Step 7

  • Use your finger to smooth all of strip 13. Make sure it is neatly aligned with the right side of the frame and that it sits flat.

Step 8

  • Work your way around the perimeter of the iMac, adding three more adhesive strips in the same manner.
  • Working counter-clockwise from strip 13, place.
  • On the iMac Intel 27" Retina 5K Display, strip 12"s blue tabs will not line up with the top antenna in the same way as the regular model. This is perfectly acceptable and won"t impact the performance of the strips or antenna.

imac, adhesive strips, apple display repair, imac display repair adhesive, imac adhesive stripsimac, adhesive strips, apple display repair, imac display repair adhesive, imac adhesive strips

imac, adhesive strips, apple display repair, imac display repair adhesive, imac adhesive stripsimac, adhesive strips, apple display repair, imac display repair adhesive, imac adhesive strips

imac, adhesive strips, apple display repair, imac display repair adhesive, imac adhesive stripsimac, adhesive strips, apple display repair, imac display repair adhesive, imac adhesive strips

imac, adhesive strips, apple display repair, imac display repair adhesive, imac adhesive stripsimac, adhesive strips, apple display repair, imac display repair adhesive, imac adhesive strips

Step 9

  • The two remaining strips (14 and 15) do not have guide holes and are more difficult to place than the previous ones. Before sticking them down, we recommend first setting them in their respective places on the iMac to get comfortable with their placement.
  • Grasp the red film pull tab on the 14 adhesive strip and pull to remove the backing from the strip.
  • Align the strip on the bottom edge of the rear enclosure, directly to the right of the middle screw on that edge.
  • Run your finger along the length of the adhesive strip to ensure it is straight and unwrinkled, pressing down as you go to adhere the strip to the iMac.

Step 10

  • Repeat the previous step for the 15 adhesive strip, placing it along the left half of the bottom of edge of the iMac.

Step 11

  • Gently lay the display in place over the iMac, and align it carefully.

Step 12

  • Use painter"s tape or masking tape to temporarily secure the bottom edge of the display to the iMac"s enclosure.

imac, adhesive strips, apple display repair, imac display repair adhesive, imac adhesive stripsimac, adhesive strips, apple display repair, imac display repair adhesive, imac adhesive strips

imac, adhesive strips, apple display repair, imac display repair adhesive, imac adhesive stripsimac, adhesive strips, apple display repair, imac display repair adhesive, imac adhesive strips

imac, adhesive strips, apple display repair, imac display repair adhesive, imac adhesive stripsimac, adhesive strips, apple display repair, imac display repair adhesive, imac adhesive strips

imac, adhesive strips, apple display repair, imac display repair adhesive, imac adhesive stripsimac, adhesive strips, apple display repair, imac display repair adhesive, imac adhesive strips

Step 13

At this point it"s a good idea to test your repair, in order to make sure your iMac works properly before you seal it back up. Follow the next three steps to temporarily reconnect the display cables and boot up your iMac prior to pulling the protective film off the adhesive strips.

  • If you"ve already verified that your iMac is working correctly and are ready to seal it up, skip to Step 16.
  • Gently insert the display data connector into its socket on the logic board. Be sure to press it straight into the socket, and insert it completely.
  • Flip the display data connector lock down onto the socket.
  • Insert the display power connector into its socket on the logic board.
  • Set the display back on the iMac"s rear enclosure.

Step 14

  • Verify that your iMac is turned off and unplugged from power before you continue.
  • After confirming that your iMac functions properly, disconnect the display cables and carefully lean the display forward.
  • Remove the film from the 15 strip by reaching in from above and pulling the tab straight up from the bottom edge of the display.

Step 15

  • Repeat the previous step for the 14 strip.

Step 16

  • Reconnect the display power and data cables for the final time.
  • Remember to secure the metal retaining bracket on the display data cable.

imac, adhesive strips, apple display repair, imac display repair adhesive, imac adhesive stripsimac, adhesive strips, apple display repair, imac display repair adhesive, imac adhesive strips

imac, adhesive strips, apple display repair, imac display repair adhesive, imac adhesive stripsimac, adhesive strips, apple display repair, imac display repair adhesive, imac adhesive strips

imac, adhesive strips, apple display repair, imac display repair adhesive, imac adhesive stripsimac, adhesive strips, apple display repair, imac display repair adhesive, imac adhesive strips

imac, adhesive strips, apple display repair, imac display repair adhesive, imac adhesive stripsimac, adhesive strips, apple display repair, imac display repair adhesive, imac adhesive strips

Step 17

  • Check the glass directly in front of the webcam for dust and other contaminants. If necessary, wipe it down with a microfiber cloth before you seal up the display.
  • Steady the display with one hand as you remove the adhesive liners in the following steps, or rest it lightly against the iMac"s enclosure.

Step 18

  • Remove one side of the protective film from Strip 11 by pulling its tab straight up.

Step 19

  • Remove the other side of the protective film from strip 11.
  • Repeat the previous steps to remove the protective films from all the remaining adhesive strips (labeled 11, 12, and 13).

Step 20

  • Remove the tape securing the display to the rear enclosure.
  • To ensure a strong bond, carefully tip the iMac flat on its back (with the screen facing straight up) and press carefully but firmly around all four edges of the display.

Related products

Shop
( 2448 Reviews )
Top Selling Products