


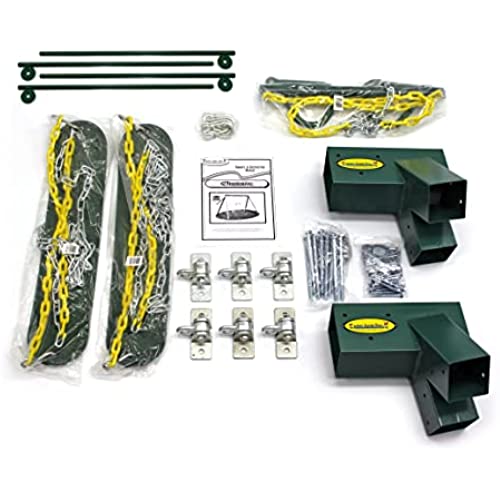

Eastern Jungle Gym DIY Swing Set Hardware Kit with Easy 1-2-3 A-Frame Brackets, Swing Seats, Ring Trapeze Bar and All Assembly Hardware and Instructions - Wood Not Included
-

Michael Moore
> 24 hourThe hardware kit appears very heavy duty and proved fairly easy to assemble. I did it by myself but would recommend 2 people, particularly to move to the final location, upright, and level. I used large furniture sliders to move it around on the grass fully assembled. The only thing I might do different is to make the legs using 9 ft. - 4x4s. I bought 8 boards as recommended by Eastern and now wish it were a tad taller. I had to sand the 4 x 6 top beam quite a bit on one end to get it to fit (used random orbital sander). I ended up using a 3 lb. sledge and a large block of wood (to prevent bracket damage) to get that end on. The second end required a bit of sanding but went on much easier. I also recommend a drill with a built in bubble level (mine is a Dewalt) to drill the bolt holes through the top beam for the hangers. I would have given it 5 stars but for the cost.
-
OHmommy
> 24 hourLook no more. I read review after review on Amazon and was reluctant to purchase this one because it didnt have many reviews. So glad I trusted my gut and purchased this one. My husband had it up in one hour with the help of our 11 year old. It is heavy duty and all three of my children ages 11, 10 and 7 are able to swing on it and it doesnt budge. He took the brackets to the hardware store and was out with the correct wood beams in minutes. There were no instructions but anyone with a little building knowledge can figure it out. We had a Rainbow Cedar swingset playhouse at our old house and was looking for something similar but much smaller to fit in our new smaller yard - this was EXACTLY what I was looking for. I am thrilled with this purchase and would recommend it to our friends.
-
clint droll
> 24 hourBe prepared to sand every single post that is supposed to fit into these “easy” brackets. It’s an absolute joke that it takes so much personal labor to get these to work. I have an idea, make the bracket openings a little larger and provide a pack of shims. Dang.
-
TJ
> 24 hourTurned out great! Had our handyman put it together and he said it was pretty easy to assemble once you get the lumber you need. Very sturdy and kids love it! Strong enough for adults to swing! Love that the chain has a coating to prevent rust and not get hot for little hands in the summer. Materials are good quality. Totally worth buying it this way...saved about $300 to do it this way vs. buying from local hardware stores.
-
Stephen Kennedy
> 24 hourThe kit was all there with heavy duty hardware. Lag bolts were enough with extras. Took two people two hours to assemble.
-
Steve and Amy
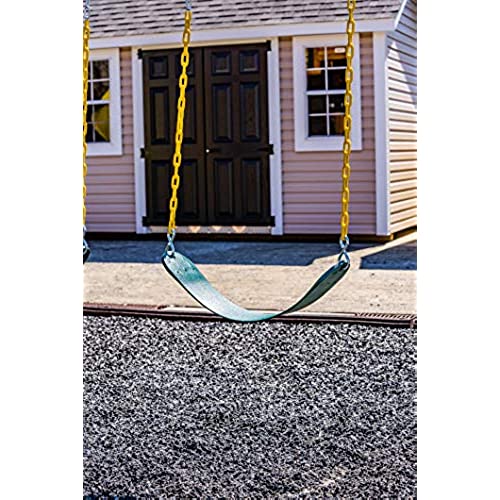
> 24 hourThis is an excellent kit to build a swing set. EVERYTHING you need is included except the wood and stain. While it calls for a ten foot 4x6 for the cross piece I opted for a 16 footer thinking I was going to add another swing on the outside. But the angle of the legs was too much. So instead I made a 14 foot span for 4 swings (or other options) in between. You wouldnt want 4 adults swinging at the same time but 2 adults and 2 children should be fine. I selected Douglas fir for all of the wood. 1 4 x 6 x 16 for the beam and 4 4 x 4 x 8s for the legs. I sanded every piece, every side with an orbital sander 60 grit. Then I applied a heavy coat of exterior stain. We chose a light stain which turned out just a tad darker then the natural wood. The brackets just barely slid over the 4 x 6 after I pried the sides out a tiny bit. First time I tried they stuck a bit. Just a tiny spread helped the bracket slide on. This was extremely important because I attached the brackets to the 4 x 4 legs first. Then I propped the 4 x 6 on two ladders and slid the bracket with the two legs onto the 4 x 6. Which is why I made sure they would easily slide on! Doing it this way allowed me to see just how the swings would work which is when I realized they would all have to go between the legs. Then I took the legs off and measured and drilled the holes for the brackets that hold the swings. It was easier to drill the holes with it down on the ground. I attached the brackets after I put it back together. I was concerned about the brackets getting in the way when I was lifting it back up. Since I had the extra length I adjusted the measurements of the instructions. The swings on the ends are 20 inches from the outside of the brackets. Considering the legs angle out away from the swings you have 30 or more inches of room between the swing and the legs. Then I put 18 inches between each swing with 18 inches of space for each swing. Again, it was much easier to measure and drill with the beam on the ground. I put it together by myself. The beam wasnt terribly heavy to lift up onto the ladders. I lifted one end on the first ladder and the other end resting on the ground. This made it really easy to slide the the first A (bracket with legs) onto the first end. Then I put the other end onto the other ladder (I had to add about 6 2x4s to get enough height with my ladder). Attaching the other A wasnt too difficult. I just wiggled it onto the beam up to the line I had drawn. Then I drilled the 1/4 inch pilot holes and attached the brackets to the wood with the included lag bolts. The swings are good quality and the chains are coated at the part where you would grab to prevent fingers getting pinched. It only comes with enough brackets for 3 swings so I ordered another set and chair for my fourth. Its easy to attach and un-attach different swings or equipment with the included spring clips. Our grandson loves it and so do we! And it looks great, too!
-
A. Churney
> 24 hourHad every thing you need for a swing set. I routed (1/2 round over bit) and sanded all the beams before assembly. The 4x4s had ample room to go into bracket. Not so much for the 4x6, took some pounding. I used a 12 footer for the 4x6 and 10 footers for the uprights to have more space between swings and to have longer swing. At first I was scared that my wife and I couldnt lift it into place, but we had no problem when it came to lifting it.
-
Kane Wuckert
> 24 hourArrived on time, all parts as described. Made erecting a swing set for my Granddaughter possible by myself. Does require some tools, knowledge and patience to drill the mounting holes straight through the 4X6 top beam. Buy dry wood if possible or let the wood dry in a warm garage for several weeks for best results. Use shims to level the beam before drilling each hole, (if it is at all even slightly twisted) and clamps to hold it stationary before drilling. A drill press will make drilling straight holes much easier. Once it was all drilled and the hardware mounted I placed all the parts on site and built it there. Once totally built and the swing was laying on its side I lifted the top beam of the A frame up and placed it on a 5 foot ladder then used a rope attached to the top beam and a small tractor to slowly pull the swing upright. To keep the swing from tipping too far I had a friend use a rope to counter the pull from the tractor and let the swing settle slowly to the ground. Tie down stakes placed, all set up and ready to swing
-
Dad
> 24 hourEasy to assemble and sturdy. Im 205lbs and was the test dummy, I was swinging pretty high and there was zero lift on the swinget legs (I have not staked it down yet). I followed others advice and used 10 4x4s as well as the full 10 4x6 for the extra height and its perfect for us. FYI to drill the swing hardware bolts invest in a long ⅜ drill bit to drill through the 4x6.
-
Dana Gavre
> 24 hourWe are 2 months into using the Eastern Jungle Gym Classic Swing Set and love it. We replaced the trapeze for a toddler bucket seat (also Eastern Jungle Gym) for our almost 2 year old. He loves the swing & asks to swing often. I also love it and will swing for hours on end into the night. Assembly was relatively straightforward, but here are some notes: - Check the bolts & nuts. We had a bolt that was bent and went to the big orange store to get a new one. - I personally did not use pretreated wood, because Id read about the dangers of getting a splinter from the treated wood. Instead I used a standard deck stain - That same big orange store cut my 4x4s & 4x6s for me so no need to break out the circular saw. - Make sure to get a long enough drill bit to go through the 4x6. Trying to meet from either end would take a level of skill I didnt even want to attempt. - I was able to assemble the entire swing set by myself, but needed help flipping it over into place

