
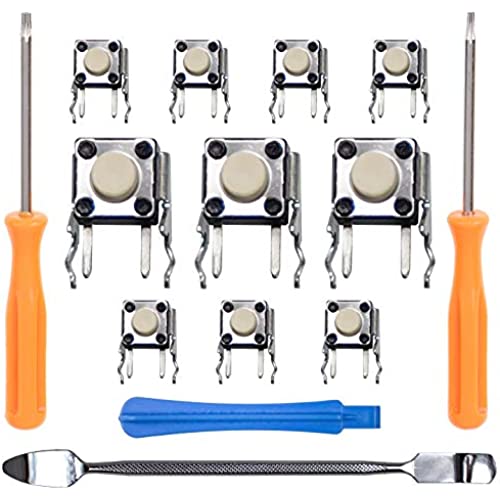
SOSS GAMING 2021 Tactile Switch Repair Kit for Xbox One Controllers Base Model, S, Elite Series 1, Elite Series 2 - RB LB Bumper Button Repair & Fix (10 Pack)
-

Daniel B
> 3 dayThanks for making a great video describing the process and for selling an easy kit to fix an elite series 2. I just did the repair and my bumpers work perfectly again. Thank you sir.
-
Jon Bins PhD
Greater than one weekIn March, I received a warranty replacement from Microsoft after both bumpers failed on my Elite Series 2 controller. The right bumper on the replacement failed this month. The replacement was no longer covered by Microsofts warranty, which is an issue because I use Bumper Jumper on all FPS. I didnt want to spend another $180 on a new controller, so I bought this as well as the soldering kit and helping hands linked in the Youtube video for about $40. After about 2 - 3 hours (no prior soldering experience, but pretty mechanically inclined) I was up and running as if the controller was brand new! Couldnt be happier with this! As a bonus, the kit comes with 10 replacements, so once the bumpers eventually fail (which they will), Ill be able to replace them without spending another dime. And now that I own a soldering kit, I can fix other electronics. TLDR: buy this kit if your bumpers are busted, controller is out of warranty, and you like DIY projects
-
Jay Heckstetter
> 3 dayThe buttons are a exact match for the Xbox controllers. To install them takes some time. Removing the buttons and resoldering the new ones is not a quick task. Advanced soldering skill is required.
-
Mitch Maye
> 3 dayThese helped me a lot! Saved me $180 for a brand new controller and they work great. Installing is a pain but that’s the controllers fault not these buttons
-
Nick Hager
18-04-2025These worked like charm and fit like a glove. Very satisfied customer!
-
Victor Guerrero
> 3 dayIt works just fine if your into fixing your own Controller
-
Caithm
> 3 dayEasy to install and had everything needed in the kit.
-
Manuel
> 3 dayMy new elite series 2 controller lb started acting weird after just 2 weeks I bought this switches and they seem to be higher quality than the original.
-
Steven
> 3 dayThe hardest part of this whole job is de-soldering the old switches. I ended up cutting the old switches out. In retrospect, I think heating up all four pins simultaneously would have been a better idea. Their YouTube video recommends this method but shows several other techniques, as well. Choose what works best given your skills and tools. A commenter on the video mentioned that you dont have to de-solder the rumble packs. That person was correct. Theres enough slack in the black & gray wires to disassemble everything. Just be careful to not tug on the wires. One tip. The buttons will inevitably fall out or become dislodged during disassembly. They are all keyed, so make sure they are oriented correctly or else they wont fit snugly in their respective holes. The video doesnt mention this and speeds through this part of the reassembly. I spent way too much time struggling to reattach the blue board, which rests on top of the buttons. Other than that, this was a great repair kit. The 2 Torx screwdrivers and metal spudge did the job. A plastic spudge is included but I never used it. Im hoping the switches will last longer than the originals. The seller claims these are higher quality switches that are used on the previous generation controller, so well see. Since the kit comes with 10 switches, I can always redo the repair.
-
steven
> 3 dayWas generally easy to install hardest part is removing the old switches. As far as quality these are still working after a couple months but time will tell.

