
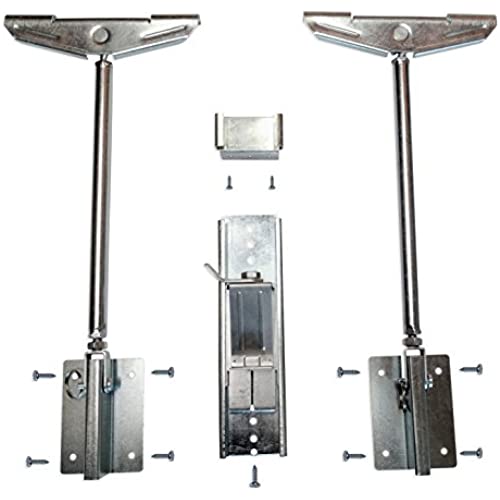
Never Fall Complete Sink Repair system
-

~*~ Sunshine ~*~
> 3 dayWe just installed these on our under-mounted, stainless steel, double kitchen sink yesterday and I am impressed. Our home is 12 years old and the sink has been dropping in front for some time now. We tried tightening the existing clips but it didnt last, which brought me to research solutions when I found these. Before fixing it, there was a 3/8-1/2 inch gap in the front of the sink, for reference. Im not sure of the limits of the brackets, but they were able to close our gap. Our sink was mounted with 4 clips held up with screws that are placed in slots milled into the underside of the granite countertop, and a glue/sealer between the sink and granite. This may have been adequate if not for a garbage disposal and the fact that the cabinet has a little hinged utility drawer in front of the sink making it impossible to support it in that entire area. That noted, we couldnt use the center mount that was included with this kit either, but the two side supports seem to be doing a great job by themselves. These parts are very sturdy and made well, IMHO. I was impressed with the weight and heft when I unpacked them. There is peel and stick glue-tape on the mounting brackets to hold them to the cabinet wall after you place them and before you screw them in, which is a huge help in installation. Its still a task with many frustrations, mainly from lack of accessibility under a sink with existing pipes and a garbage disposal, but we managed to mount them and tighten everything together after the caulk/sealer was applied. Hooray! It looks like a successful project completed! Fortunately, our double sink was a tight fit in the cabinet and the walls were close to the edges so the angle for mounting these was pretty ideal. We were able to fit the braces between the original clips and tighten them up as well so, hopefully, the combination will be adequate to support the weight even without the front sink support. There are other options that Ive seen in my research, if needed, that could be added, like a brace under the disposal or sink basins. I will update my review if there are any changes or failures with this kit. I would strongly recommend it at this point and, if youre a DIY-type person, that you would be able to install it yourself. Otherwise, Id advise a handymans assistance. 5 stars at this point!
-
RPG
Greater than one weekThe space between our sink and the cabinet wall was just a shade less than the width of this thing. I made it fit after using a vise to squeeze the two top tabs until they were the same width as the rest of this contraption. After that it worked fine, although of course it needs removal of all the PVC and the garbage disposal in order to have space to drill a starter hole and then use a screwdriver. There is no reason for this contraption to cost so much.
-
Prof. Elmer Goldner
> 3 dayIm FAR from a handy man and I was able to get this installed correctly. Super-simple and genius product, really appreciate this as it made my life much easier! Would highly recommend it!
-
Mr. Leopoldo Lebsack DDS
Greater than one weekThis was the second time my sink had collapsed, and Id previously been unable to find a good solution. Im so happy I came across this product. It was pretty simple to install, the only problem being access under the sink. I wasnt able to use the front piece because of the design of my layout, but even with just the two side supports in place, Im pretty confident the sink isnt going to move again. It makes sealing very simple, you can adjust it to leave a gap, apply the sealant, then simply wind the sink upwards against the counter top.
-
Phone User
> 3 dayMy kitchen sink fell into the cabinets below on the first day of the COVID-19 lockdown in my town. The silicon glue that held the sink in place had failed. After a few panicked expletives, I started researching options to fix my sink. Luckily, I found some online videos and reviews of the Never Fall system. I ordered it and it arrived with Prime delivery three days later. Within twenty minutes of opening the package, my sink was back in place! I sealed around the edge of the sink with silicon caulk for moisture-proofing, but otherwise the Never Fail hardware is the only thing holding my sink up now, and it is doing a great job so far! I used both side brackets as well as the front optional bracket because, well, if the hardware comes with it, I might as well use it. Ill update this review if I ever have any issues with the hardware over time.
-
AP
> 3 dayIn almost 20 years, this is only my second Amazon review. This product is so perfect, I just had to leave a review. My undermount sink was pulling away from the granite. I stressed about it for months and wasnt really sure what to do about it. I was afraid to hire some local handyman who could accidentally crack my granite countertops. Long story short, I had these installed and my sink was fixed in less than 30 minutes from the time they were delivered on my doorstep. Im not a handyman, Im a computer programmer by trade. The instructions are simple, well written, and in perfect English! These things are so easy to install, so sturdy, and make so much sense! I dont know why they arent required by code to begin with! For the price, theres no reason to wait for your undermount sink to fail. Just go ahead and buy these and never worry about it again.
-
Bill R.
> 3 dayLess than two years after installation, the silicon seal on our stainless steel kitchen sink gave way and the sink dropped about 1/4 inch. Fortunately, the single strap that was used to secure the sink was still in place, and it prevented any damage to the disposal and plumbing. I was surprised (and somewhat disappointed) that there was only one strap used to hold the sink. Installing the Never Fail system was straight forward and quick. I didnt have to remove the disposal or any of the pipes. Except for bumping my head once on the garbage disposal (lol), the installation was flawless. The most difficult part of the install was scraping away the old silicon. (And that wasnt hard at all). I had the entire project finished in about 30 minutes (and that includes putting everything back under the sink!) I would absolutely recommend the Never Fall Complete Sink Repair System to anyone doing an under counter sink install. If I was a sink installer, this is the only product I would ever use.
-
Rick Salve
> 3 dayMy sink collapsed from the weight of a bowl of water!? Didn’t know that was possible. Suspended by epoxy resin from the granite countertop, I was actually shocked that it didn’t happen sooner once I saw what was holding it up: essentially a couple beads of epoxy resin. Following my tradition of overstructuring anything I DIY, I installed 2 on each side of the sink. That also provided me the maximum flexibility of being able to support the sink from asymmetric points. Otherwise, I would have take all of the plumbing out, including the garbage disposal and the water filtering system, just to get a clean access. If you are like me, and would rather lift everything as the video describes, your biggest challenge will be to drill the supporting screws before tightening the turnbuckles and restoring all of the sink and hookups to its prior position. BTW, that actually works. I was skeptical. For that reason the adhesive backing feature is a God send, since it supports the brackets before you can get the screws in. Get it level as possible once you stick it into position. As far as screwing the brackets to the side of the cabinet walls, one should use a flexible drill bit. There just isn’t any room under there. Despite the flexible drill bit, I still had to install half of screws blind or by feel. To that end, I recommend drilling pilot holes first, then the screws. It’s so much easier since drilling at bend will reduce the force you can apply. If you’re unsure where to put the brackets, just tighten the turnbuckle when you open the package just to see what the maximum lift distance is, and you’ll get a feel for what you have to work with. Account for the fact that brackets will support the sink at angles. The turnbuckle only will give you about 3 inches or so to lift the sink. Position the sink first. To achieve this, I just propped the sink up with a bucket and a couple pieces of wood from the bottom of the garbage disposal until about a 2-3 inch clearance existed between the bottom of the countertop and the top of the sink. Attaching the brackets with the screws is the most time consuming part, otherwise everything went as planned or as the video shows. The next most time-consuming part is removing the previous calk to create new clean surface to calk. Calk and then lift the sink as evenly as possible by turning each of turnbuckles counterclockwise until the sink and it’s attachments are back into position. Weird as it seems, the plumbing will actually help, since it “wants” to be in its previous position. Given these caveats, the product works great and is an improvement over what was there. I’m pretty sure I can stand in the sink if it we’re not for fear of denting the stainless steel.
-
Michael
06-06-2025We have an under-counter stainless sink with granite countertops. Our builder used some kind of cardboard and glue tabs to hold the sink on. Well, that lasted about 5 years. This worked perfectly to lift up the sink back in place. Install: it was not hard but a little messy and time consuming for the home DIYer. Once you remove the sink you need to really clean up the sink top and under-counter area. I did this with a scraper and steel wool. Installing the hardware was simple a few measurements and fit checks were all it took. You do want a partner in this endeavor to help hold and align the sink with the counter. There are a few good YouTube videos showing installation.
-
KelliPagels
> 3 dayEasy to install, highly suggest!
