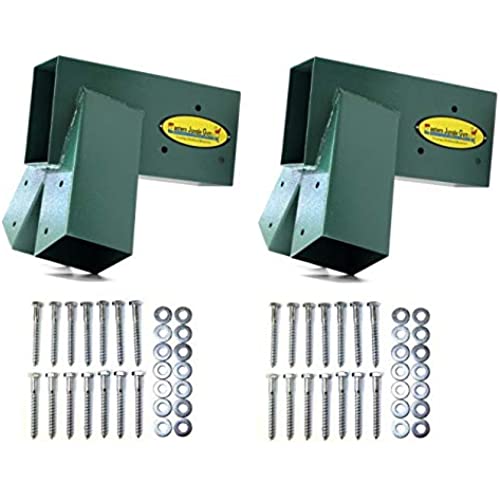


Eastern Jungle Gym Easy 1-2-3 A-Frame 2 Brackets for Swing Set with All Mounting Hardware, Green
-

Rene C.
Greater than one weekVery sturdy worth the buy,but 1 bag of screws missing had to go buy some
-

TX Matt
Greater than one weekI built a swing for my wife out of an old swing we found on a neighbors curb. Four 4x4’s and a 4x6 fit well into the brackets. I am planning to use the same from for a swing for our kids one day. I like how you can customize whatever you want to build.
-

Timber Paris
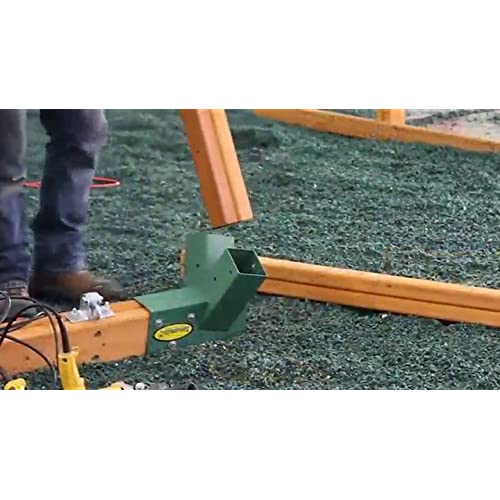
> 3 dayFantastic product!! A really great price for a high quality product. I was able to get this all done on my own in the course of an afternoon with very basic tools. Im really happy with the end result, its got clean lines, looks neat, and is incredibly sturdy. If you need a basic A-frame, you cant beat this. I did have to do a little rubber mallet banging and sanding to get a few of the pieces of timber in, but thats probably because the pressure treated lumber can swell oddly at the ends and Im glad they fit so snugly anyhow. Id definitely suggest doing the large cross beam first. After beating with the rubber mallet for way too long, I realized I could pick the whole thing up and gently drop it on its end on a piece of plywood to get the cross beam totally seated into the bracket. Im pretty strong, and I took pains to do it gently, so be careful if you take this tactic, but it worked like a dream. I also thought itd be easier to put the legs in starting with pushing in the one that would be flat on the ground first, but that wasnt so. It was easier to pick up the 4x4 and let gravity to a bit of the work to get it slid into the upward angled leg slot (with the bracketed cross beam laying flat on the ground) first, making sure to add a bit of upward force to it to make it square in the slot as I drilled my pilot holes and ratcheted in the bolts. I needed this A-frame for some large scale crafts projects that I do, so a 4x6x8ft cross beam is perfect so that I have just over 6 of clearance inside the legs of the frame. However, if youre doing this for swings, especially if its for adults or you just want some extra clearance, you might want to go for the 10 long cross beam. I hope my experience helps you along, Id definitely recommend this product with confidence!
-

Don Eckrod
> 3 dayBrackets were just what we needed to finally hang a handmade porch swing. The brackets are heavy duty and the 4x4’s fit easily. The 4x6 piece was a little more involved. Had to shave the ends a bit but probably was due to a lot of moisture from the treatment process. All turned out great.
-

Joshua
> 3 daySuper sturdy and great coating. I definitely recommend bringing them to store when you are purchasing the wood. Wood is not all cut correctly every time so bring the bracket to confirm the wood you select fits into holes
-

Robert LaCombe
> 3 dayBrackets are great. Hardware seems fairly cheap.
-

James
> 3 dayI have assembled two of these swing sets now one at our home 12ft wide with 3 swings and one at my 87 year old grandmothers house 16ft wide with middle support bracket, a bench swing for her and 2 kids swings. First I will address some complaints in other reviews about brackets being too small for a 4x6 PT beam. Yes the beam fits tight and that is how it should be. Due to the process, and its all in the name pressure treated, they force chemicals into the wood with pressure to preserve it. Youll notice over time even on your deck the deck boards you fit together snug will shrink as they dry out and leave you ⅛-³/¹⁶ gaps if you buy your lumber the same day and expect to slap it together its gunna fight you. That said there are a few tricks you can try. Light coat of vegetable oil or as long as the wood is fairly dry try cornstarch. Then use a wooden block and a sturdy hammer. Best case would be buy the lumber and give it a couple weeks in a sunny spot. You want a snug fit it will be sturdier and movement will affect the hardware and brackets much less over time. Otherwise drill pilot holes for the lags. Build it on a set of saw horses and it will be far easier to tip it up once you are done. Buy sturdy swing hangers or have some made at a local metal shop. No need to cut legs to the angle of the ground they will sink into the grass somewhat and give a sturdy footprint. Also due to covid supply issues you may want to source the lumber prior to ordering the brackets. When it came time to built my grandmas swing set treated lumber was all but impossible to come by. Had to drive 50 miles to find 4x4x8 for legs.
-

bobcat
> 3 dayThis product works great, appears to have a good coating and came with hot dipped galvanized lag screws to prevent rust when used on treated lumber. I had read reviews from people who couldnt slide this onto cedar lumber. That is because cedar comes in full 4x4 dimension, whereas treated lumber is called 4x4, but is actually 3.5x3.5 nominal dimension.
-

Mike Chombeau
> 3 dayI had the thing built in an hour
-

Miss Krystel Prosacco
> 3 dayWe used these for a swing set. Worked perfectly. Was super easy and is so much sturdier than the swing sets you purchase with play sets. I’m so glad we purchased these.

