


ARB INFLATION3 Twin High Performance Air Compressor CKMTA12 and Extension Hardware for Easy Installation and Connection in a New Printed Box, Ideal for Lockers, Horns, Tire Inflation and Air Tools
-

Beth
Greater than one weekGood pump. Turned it into a mobile unit. But... I have not used it in a cave.
-
Mr. Paul Sawayn V
Greater than one weekDoes what it’s suppose to do, I use it for airing back up my 35’s after a trail, in my opinion it’s pretty fast, a lot faster than the portable one I used before, soon I’ll be using it to provide air for a locker as well
-
Ceeg
> 3 dayThis is an excellent compressor. It is very expensive but you get what you pay for. This thing is heavy and very solid. I use it for airing up tires during 4x4 excursion as well as other random things around my house. If you have a 4x4 you need to have a way to air up a tire.
-
Drbkemnitz
> 3 dayInstalled under the passenger seat in my Jeep JL. Works great for quickly airing up tires but won’t run air tools without a tank
-
JJDPM
> 3 dayJust perfect
-
Mike
> 3 dayYet another high quality product from ARB. The performance has exceeded my expectations by a lot. After a year, my follow up: I was a little disappointed to find out this compressor is made in China. But the performance is rather incredible. I actually did an experiment to put some numbers to it. Keep in mind, the low tire pressures I run help the performance. I run a 38 x 13 Super Swampers TSLs at 4 PSI when Im off-road. On rare occasions I need to run on the road, so I like to air up. This compressor will take these big tires from 4 PSI to 11.5 PSI in exactly 30 seconds. Im airing up 4 tires in 2 minutes.
-
Daphne Upton
Greater than one weekOverall a good product but the mounting system needs to be better thought out. I purchased this to replace a QuickAir 1 compressor mounted in the engine bay. The two are roughly the same size with the ARB being slightly taller. I have yet to hook this up to my existing 2.5 gallon on-board air tank and try airing my 35 tires back up so I cant speak for ARBs claims that this compressor is significantly better than their original smaller compressor in that respect. The silver tube at the top of the compressor is an air reservoir which is there solely to have a small reserve for actuating ARBs air locker(s). There are three ports. The tube is designed to have both locker solenoids installed on one side and the pressure shutoff switch installed on the opposite side (opposing one of the solenoids). The silver tube can be rotated to some extent to point the ports at a different angle and the silver tube can be rotated to position the solenoids on the opposite side of what is shown in the illustration. Theres quite a bit of flexibility for positioning the solenoids. Since I was replacing an existing compressor and didnt want to re-engineer the entire setup, I installed both solenoids on the silver tube vertically (air vent pointing up). Note: I run vent tubes from the solenoids to exhaust outside the engine bay under the chassis in a protected location. Passengers have complained about occasional exhausted fumes from the differential(s) drifting back into the cab if the window(s) are down. The issue is that there isnt enough clearance between the two solenoids when positioned parallel to the silver tube for the fittings on the solenoid vents to fit so I positioned the solenoids vertically. This significantly increases the height (or width if the compressor is rotated 90 degrees in the mount). If the compressor is mounted on a bracket on top of a fender well as mine is this may cause hood clearance issues. Fortunately, I had just enough space to clear the solenoids. The compressor itself can be rotated either way 90 degrees from the mount base plate and at any degree in between. Also a nice touch. That gives a lot of flexibility in mounting locations. The single negative point Ive run across to date is the mount bracket (base plate) and as far as Im concerned theres no reason for it. This is a simple problem and should have been considered by the engineer(s). Not a big surprise to me as this isnt the first ARB product where the engineering has fallen down on a simple, basic point while acing all the complicated issues. In order to mount this compressor, you must have clearance to the bolts that mount the black steel plate from the sides or bottom OR clearance from both ends to the bolts that mount the compressor heat sink to the black steel mount plate. The blue band is an aluminum heat sink that wraps around the compressor motor and attaches the motor to the base plate. The band/motor is attached to the black base plate by four Allen head screws - two from each end running parallel to the motor. Unfortunately the body is larger in diameter than the black steel base plate so its not possible to get a socket onto the bolts from the top. That means you must use the supplied carriage bolts and a boxed/open end wrench on the nuts from the side or a socket from the bottom. Presumably, the idea is to remove the motor/heat sink from the black steel base plate, attach the base plate to the body/fender/stand/etc., then re-attach the motor/heat sink to the mount plate via the four screws. Thats great as long as you have at least 6-8 of clearance AT BOTH ENDS or to EACH SIDE. The four screws run through rubber bushings which makes re-installing them very close to impossible using just finger tips. At the end of the day it took 6 hours to install the four screws and two of the carriage bolts (one one one side at one end, and one on the opposite side at the other end). It proved impossible to install the other two carriage bolts without drilling 3/4 holes through the fender and fender skirt. Obviously no thought was put into actually mounting this in real life where there wasnt a foot of clearance all the way around the compressor. The solution is simple. #1 Make the blue heat sink band a two piece clam shell unit. Half the job is already done. The band has two screws that loosen to allow the compressor to be rotated 90 degrees. Put two on the other side creating a clam shell setup. Take the four screws out, lift out the compressor, bolt everything up and put the compressor and four screws back in. #2 Make the black steel mount plate a two piece unit. From ARBs illustrations, it appears at first glance to be that way already. Its not. Make it a two piece unit so that each end of the bracket can be flipped 180 degrees so that the tabs point towards the ends of the compressor vs. the center. This would allow for using a small 1/4 socket wrench with a long extension to bolt the compressor to the body/fender/whatever and not require removing the compressor/heat sink assembly from the mount plate. The compressor comes with wiring and a bag full of hardware. Since I already had a compressor (rated at a higher amp draw) with dual air locker solenoids installed almost all of it turned into misc spare parts. One piece that I REALLY wish they would have put in the bag is the T that they supply in one of their other kits. The T screws into the port used for the on/off pressure switch and allows for the pressure switch to be installed and still have an open port to attach an air line for an air tank. Or, again a simple solution, would have been to have four ports on the silver tube. Overall the product seems to be decently built and I expect it to do what its supposed to do for some time. Were I doing this on a new vehicle without a previously installed air system, I probably wouldnt have gone with a compressor at all and used a QuickAir CO2 system to actuate the air lockers - or maybe I would have gone with mechanical lockers instead of ARB air lockers.
-
Greg
> 3 dayThe compressor arrived super quick, but the toggle switch was damaged in transport. I contacted the seller who was VERY quick to respond, and continued to respond quickly during all of our correspondence. They were very courteous and contacted the distributor on my behalf and had a new switch to me NEXT DAY. I was relieved that I didn’t have to deal with weeks of an exchange process and was able to finish up the compressor installation. The compressor, and all related components are very high quality. Installation was a breeze, and the harness leading from the battery to the compressor, and from the compressor to the cab was the perfect length. The amount of lead provided into the cab is sufficient enough to allow for switch installation anywhere a driver could reach. The bracket used is the EVO 1097 compressor mount.
-
Kenneth
> 3 dayI purchased this compressor to mount under the hood of my Chevy Colorado. I ordered the compressor and was surprised to have it the next day. I had used the free shipping that stated 5-8 days. I was very surprised. I opened the box to find the compressor and parts to be in excellent condition. The box contained everything needed for installation. It even had ring terminals and connectors to wire the harness to the battery. I was very happy with the wiring harness as well. The harness that is supplied with the compressor is designed for lockers, but I am using this compressor for tire fills. The harness was labeled very well and instructions were clear. I had no trouble with the wiring harness. The harness is plug and play. ARB even leaves one plug disconnected so only a small hole has to be drilled to get the switch to the cab area. I simply taped off the wires that I was not using. The wiring had a nice looking switch that is designed to be recessed in a small cut out. I found the switch to be good. The location I mounted the compressor was very tight, but the mount is made to pivot. I was unaware that the compressor body and manifold tube can also be rotated to facilitate various mounting locations. The compressor itself was heavier that I expected, but that was great. The compressor feels well made. I mounted the compressor and made the appropriate wiring connections under the hood. I actually mounted the switch under the hood as well. I used a small plastic gang box used in home wiring and used a Dremel Tool to route out a hole for the switch. I then used a metal plate to cover the box. I was then ready to use the compressor for the first time. I hit the switch and the compressor fired right up. The compressor only ran for about two seconds and shut down. The compressor comes with a pressure switch that shuts down the unit at around 90-100psi. The manifold tube is very small and it gets to that pressure very quick. The manifold tube also has a built in pressure safety relief valve just in case the pressure switch fails. I am not sure what pressure is required to permit the safety valve to operate. I had to source my own fittings to use the compressor as a tire fill unit. I did not purchase the kit offered by ARB because I can build it cheaper myself. I spent an additional $15.00 to make a manifold for my tire fill kit. I had to buy several pieces due to my mounting location under the hood. I also suggest to anyone that purchases the ARB tire fill kit to buy some Teflon tape. I completed the procedure and was ready to fill a tire. It should be noted that I already had 50 feet of 3/8 air hose and fitting to use the compressor. I wanted enough hose to reach from the engine bay to the tires on my travel trailer without uncoupling the trailer. I had been carrying a portable air tank in my truck that holds 120 psi. I decided to test the compressor by filling it up. I turned on the switch and watched the hose fill with air. The compressor then promptly shut off as designed. I filled my air tank from approx 40 psi to 90psi in approx 1 1/2 to 2 minutes. The compressor stopped filling at 90 psi. I was still impressed at the speed given the size of the compressor. I filled a car tire from 10 psi to 32 psi the next day and was equally impressed at the compressor. I think it was a wise investment and would buy it again if I had to go back. My installation took my friend and I two hours to complete. I had a small area to work with and had to build some tools to install some small screws in a tight place. I think my installation time was long, but I had a unique mounting location. Anyone with basic skills could install this compressor easily. I needed to drill three holes. The mounting plate has four holes, but I didnt use one due to mounting location restrictions. This is a good compressor and I hope to use it for many years. Good luck.
-
BigJeepin
> 3 dayAirs up 37x13.5 tires in about 4 minutes


INFLATION KIT EASY ACCESS FOR CKMTA12
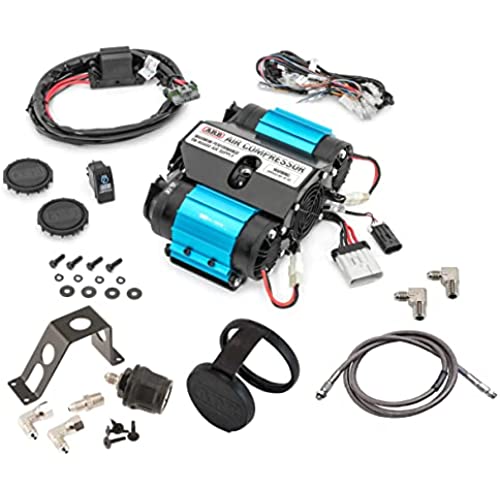
ARB CKMTA12 Twin Air Compressor 12V with Extension Hardware
Kit Includes: Air Compressor CKMTA12, two ARB 0740110 Branded 90 degrees Elbows JIC4 Male 1/4" NPTM, ARB 171314 Remote Hose Coupling Kit with Quick Connect Coupling, 3 Way Mounting ARB 0740113 Branded Air Hose and ARB 074203 1 m Braided Air Hose.
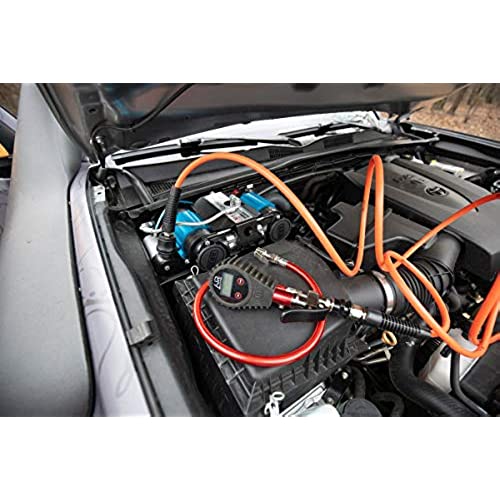
ARB CKMTA12 Twin On-Board Air Compressor
Due to the size of the CKMTA12 many truck owners have no choice but to install CKMTA12 on any available part of their vehicle, generating an accessibility problem to that compressed air. This is why inflation kit was made, in order to solve the accessibility problem and provide easy access to the compressed air.

-

TWIN COMPRESSOR
The ARB Twin motor design delivers class-leading airflow for fast inflation purposes. It incorporates internal thermal protection against extreme temperature damage.
-

DURABLE MATERIALS
Constructed of lightweight, high-strength engineering-grade materials, it incorporates quality components for quiet operation and extended durability.
-

CKMTA12 SPECS
Designed for inflating Tires and air locker activation when used in conjunction with optional accessories / 100% duty cycle / Sealed for moisture resistance / Anodized mounting bracket dissipates heat
-

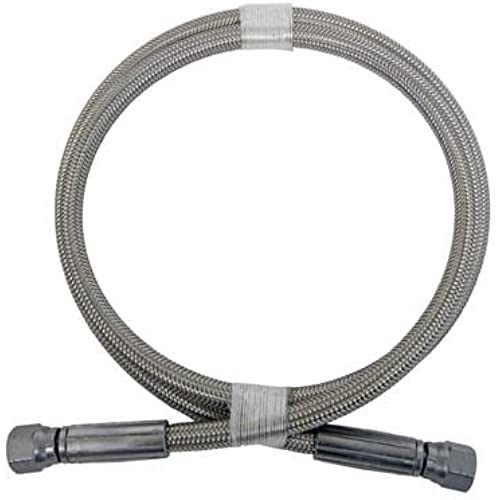
ARB 074203 Portable Air Hose - 1m Braided Air Hose
This Braided Air Hose can be installed anywhere your car hook provides easy installation and access to the CKMTA12 compressed Air.
-

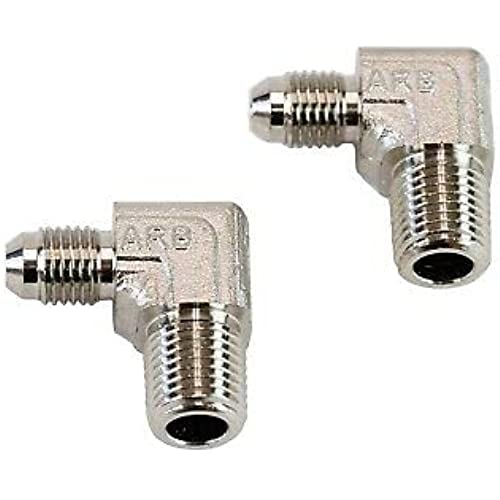
ARB 0740110 Fitting 90° Elbows - Pack of Two
Air Line Elbow Fitting will provide guidelines for the braided air hose in order to avoid the hose from pointing up, instead you will provide 90° angle so the hose can have easy access to the side.
-

ARB 171314 Brackets -Keep a steady and secure hose
This mounting brackets kit will provide the stability and a secure system in order to avoid your hose from moving to the side or having internal contact with other devices.

ARB 0740113 Fitting Cap - Protect your air hose
This cap will fit your air-pumping side from the hose in order to avoid dust and water from getting inside.

INFLATION KIT INCLUDES
Fully assembled and tested CKMTA12 Air Compressor / Complete wiring loom / Air Locker solenoid plug-in terminals / ARB 171314 Remote Hose Install Coupling / ARB 0740110 2 x 90 Degrees Air Connectors Elbows / ARB 0740113 Branded Air Hose Coupling Dust Cap / ARB 74203 1 Meter Braided Air Hose
KIT INCLUDES
