
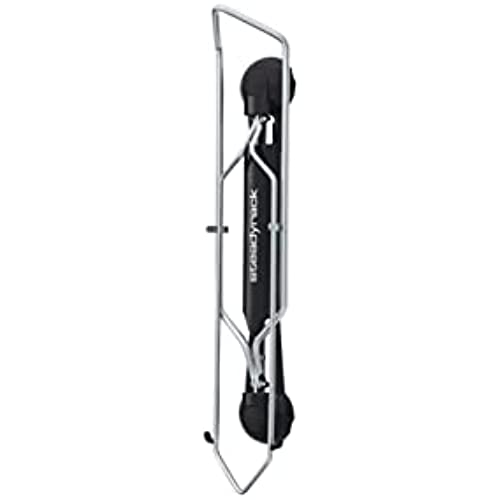
Steadyrack Bike Rack - Wall Mounted Bike Storage Solution
-

Sweet & Sour Reviews
> 24 hourSolid product that stores my fat tire ebikes. Installation was pretty simple and straight forward. It has you place the rear tire against the wall and then have the rack sit on the floor where you mark the hole for the top stud then measure from that point to the wall. Take that measure onto the wall and there you have it. Although you may want to add an inch or two. My ebikes only have 20 tires so it sat exactly on the ground as the tire couldnt sit on the whole swing arm. So I had to reinstall a little higher so the tires werent touching the ground. My ebikes weight about 73 lbs. so this rack seems to be pretty heavy duty. Only time will tell. A cool feature of this rack is being able to rotate the rack almost 180° to make more room. Really works good and makes more space for my car to fit. Id recommend this rack if you dont want to hang it from the ceiling but need room in your garage. Only reason for not getting 5 stars, besides cost, is that my ebike has fat tires AND fenders. The fender bike rack wont accommodate fat tires. So I had to undo my fender but the tire still sits on the fender a bit. Doesnt look like its going to crack, but it would have been ideal if there was a fat tire AND fender option. Overall, Im really happy about my purchase and the product looks sturdy and will keep my ebikes stored away to make room for my cars.
-
Noah
> 24 hourThe racks seem to work well and are secure into the wall. Quality: my only main issue is that the plastic caps covering the bolts area on the top and bottom are very cheap and don’t come off or attack easily. Otherwise the rack is fairly solid. Install: The one issue I had was that the bolts did not fit the 1/2 inch socket bit. In fact, they were between sizes, which is fine if you just use a large socket to drive them into the wall. Not so fine if you want to take them out without having to use a wrench. The bolts got a bit stripped in the process. I didn’t predrill my holes into the studs, because I was able to just hand drill the bolts in a quarter inch and then drill them the rest of the way. Always predrill a smaller hole than the instructions FYI.
-
Jo A. Tejeda
> 24 hourThese are the best bike racks available IMO. I wish they weren’t so expensive, but I have no regrets. I was skeptical, but they can indeed hang 16” apart. I installed all of them into studs and they are very sturdy. The only reason for the wide spacing you see in the photo is the location of the electrical outlet. I used one mountain rack for a wider tire MTB, one fender rack for a TT, and four classic racks for the road bike and a MTB with non-knobby tires. The varying heights helps accommodates 4 road bikes and two mountain bikes, one of which has bar ends. This makes it possible to pivot the bikes farther without parts of one bike hitting the next. We don’t have any trouble parking two cars and having the bikes at 90 degrees, but we typically keep them at an angle of around 50 degrees. They are easy to pivot. I mounted the racks higher on the wall because our road bikes are lightweight, and I wanted the heaviest mountain bike (far right rack) to be a couple of inches off the floor for any necessary sweeping. Plus it’s not really that heavy. I’ve not yet had a chance to mount the rear wheel rests on the two racks on the left due to bike maintenance.
-
Nancy T.
> 24 hourWhile planning for a garage renovation that took our house from a 1-car garage to a 2-car garage, we wanted to ensure we would be able to store our familys bikes in an efficient manner, but also make it easier for everybody to retrieve them when they wanted to take a ride. The renovation is almost at an end, and you can see the results... these racks are kind of magical in the way they accomplish both these goals at the same time. Im going to provide some key measurements that helped us with planning and installation. We have staggered the racks in order to space them as close together as possible, which is approximately 13-13/16 apart. (Instructions are in mm rather than inches; hopefully this helps others using the English system of measurement.) We hung the first rack 16 from the wall, so that when the rack is perpendicular to the wall for loading/unloading theres enough room for handlebars as well as the riders hands. I wouldnt put the racks closer to a corner than that, personally. There are lots of different answers online to the question of how much space is saved by swiveling the bikes as close to the wall as possible... obviously everyones bike has different dimensions so this is a tough one to answer. In our case, the bikes are approximately 44 high, measured from the ground to the top of the handlebars. When swiveled against the wall (as shown), they stick out about 30 from the wall. Granted, if you were mounting them with a more conventional rack, youd only have the width of the bike sticking out from the wall, and many bikes are 24 wide (from handlebar to handlebar). On the other hand, if you were using a conventional rack youd only be able to mount two bikes (one on top of the other) in the space Ive used for four. Plus I can guarantee that the kids would not be able to quickly take a ride without Mom or Dads help getting the bike down. This is so much better! One last measurement that greatly affected how we installed the racks: When you swivel the bike to the side, youll need at least an additional 3 (added to the bikes height) of room from left to right. This takes into account how the rack swivels from the very base of your front tire, which is not tight to the wall but protrudes slightly when the bike is mounted on the rack. In our case, the new garage space we claimed is set back from the old garage wall. I had hoped to squeeze the bikes precisely into this new space (in a different configuration, swiveling left rather than right), but those extra inches meant that the racks had to be hung as shown. They spill over a bit into the old space, but it works well especially when you consider that our youngest daughters bike will eventually be replaced with a larger one as she grows. This leaves room for that growth -- always a good thing! In the end, weve got 4 bikes in approximately 8 of width, and even our youngest can load and unload her own bike. Consider us VERY happy customers. Oh! One last note on installation: As you can see, weve installed our racks into concrete block. Drilling for and installing anchors into masonry is never easy, but since the rack is made in Australia you should be prepared to either suffer through the arduous task of hand-tightening bolts with an adjustable wrench (as I did) or get some metric-sized bolt drivers.
-
Snarley
> 24 hourSteadyrack Classic Bike Rack Twelve days ago I mounted two Steadyracks to my garage wall. Since then I have had one bike off and on the rack 15 to 20 times. The ease of use is as simple and easy as the company shows it to be in the video on Amazon. For me the racks are perfect: 1-They allow me to store my bikes in a small corner space. 2-There is little, if any, hassle accessing the bikes. 3-They mounted securely to the wall - stud and drywall. 4-They are not ugly. Installation was not real difficult, but required accurate measuring and close attention to the provided instructions. In my case, a rack mounts to the wall using a stud AND drywall. I suggest, instead of using the drywall anchors supplied, buy and use toggle bolts. I do have one complaint. All of the fasteners, lag bolts and drywall anchors, were missing from one of the 2 racks and about half of the fasteners from the other box were missing. I never notified Amazon about it, so Im not sure how this complaint would have been handled. See provided photos.
-
Jeanette
> 24 hourEasy to install. Sturdy. Space-saving. Amazing design. Far exceeded expectations and my three bikes now take up the space that one used with traditional wall racks.
-
Zachary Gorres
> 24 hourI looked into MANY other bike racks before I purchased the Steadyracks. These were the only ones I found that swivel and help save space and make it very easy to access the bikes. I needed something like this because my shed is 10 wide and my service door is directly in the middle (see picture). If I had a stationary rack the bikes would have stuck out into the middle of the doorway. I could have opted for something that I could hang the bikes on the wall above each other, but then I would have to pick up the entire bike and hoist it up 4 to get above the bike on the floor level, which is fine for me but not the other people in the household. Plus, I dont have enough wallspace to do that for four bikes. The Steadyrack solved all of my problems and make it super easy to access each bike by just swinging them a little to access the bike I need. (PS, please dont judge me by the messyness of my shed, LOL)
-
Cmd Z
> 24 hourSpent a lot of time researching and testing bike storage systems... couldnt be happier with these. They cost a lot compared to rubber-coated hooks. But, unlike that cheap option, these are rock-solid, dont scrape your rims and make loading and unloading your bike as easy as rolling it. Additionally, the ability to swing the bikes allowed me to mount them 16 apart (perfect for attaching to studs), even mountain bikes with really wide handlebars. The only gripe I have is with the installation instructions. The method for calculating the mounting height is *way* off, especially for bikes with large tires. I had to add 2.5 inches for my mountain bikes and 1.5 inches for my dual sports with road tires. For bikes with big tires, it is extremely important that the rear tire not be touching the ground, or your bike will roll off the rack. Pros - Super compact storage due to swinging mount - Unbelievably easy to roll on and off... no lifting at all - Rock-solid construction - Feels like its worth more than it cost (and it aint cheap!) - Looks like they belong in a pro bike shop or the lobby of a trendy Silicon Valley start up - All hardware included, even for concrete and masonry walls Cons - Installation instructions may only be for road bikes, so your mileage may vary - Seriously, thats it
-
Jeanine Earley
> 24 hourThese were so easy to install. The only thing missing from the directions were how far apart to space multiple racks but a quick site search found the answer on their HELP section. The fact that you can swivel them to the side is awesome and an important requirement for me was that my kids can get them on and off without me. Hanging bikes from the ceiling was not going to work for that. Now in the video the little kid made it looks effortless. I will day for my daughter who is shorter it was a little bit more challenging than how they have it shown, but a little practice should fix that up easily.
-
3kids&crazy
> 24 hourThis is a great product. Our family of five has a variety of bikes, three childrens & two adult - in different sizes. I looked at several systems and read reviews (noted that children had difficulty hooking bike tires, between spokes & balancing, etc), ultimately deciding to spend way more than I had planned on the Steadyrack. It was a slam-dunk. Steadyrack does not disappoint. This product is all that is cracked up to be and in my opinion, worth the money. I bought a four-pack for my family, and an additional fender-style for my retro bike. The area where all bikes are hanging is 71 wide. It holds three mountain bikes, my huge & heavy beach cruiser, and a childs 20 bike. I spaced them approximately 13-15 apart from one another. There would be no way to catch a stud for all these bike racks, so I had the lumberyard cut a piece of plywood to size, and mounted a ledger-board to the wall. Then I had a solid surface attached to the studs. This allowed me to install the racks with more confidence that they would be secure. Im in the United States & believe that the origin of this product is Australia. This may explain why the installation instructions are in millimeters. It was easy enough to find a conversion online, but I did have to be cautious not to make a calculation error. Measure twice, drill once! The only other note, was that in my haste - and without giving it much thought - I used the wrong fastener to hang the first rack. The racks come with both lag bolts & truss-head wood screws, which I dumped out on the workbench, and by the time went to hang the first rack, my son handed me the screw and it stripped going in - quite easily. Oops! I should have known better - so Im mentioning it for those who do not know better. The rack should be installed with the hex headed lag bolt. (Google it, if youre unsure what that is). The guidelines were easy to follow & logical. As for hanging the bikes, its as easy as it seems. My youngest is about 54 tall & 50#. Getting the bike up into position was a challenge for a couple of days. We tried different ways to hold the hand brake & use the seat to leverage on her thigh - and soon enough she was able to do it easily. I attached a photo showing all five bikes on the wall. They do rotate easily out of the way and dont fumble into each other as bikes are placed on & off. I felt like I pushed the limit on how close you would want to hang bikes of this size - and there is still plenty of room to get them on & off without interfering with other bikes. I have a lot of confidence in the longevity of this product. Its rock solid.


Steadyrack Fat Rack
Best for: Fat Bikes, eBikes with ‘Fat’ Tires
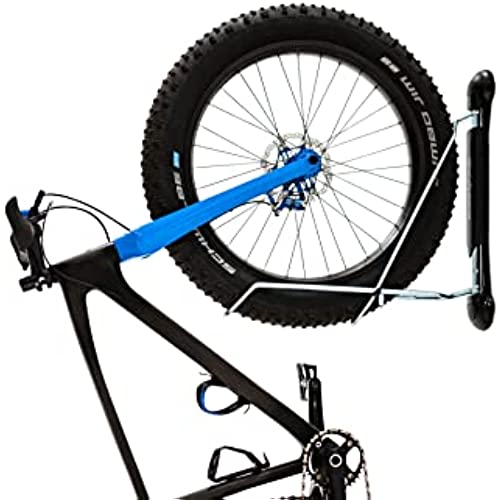
Wheel Diameter: 20" - 29"
Tire Width: 2.8" - 5"


The most versatile Fat Bike storage around
Easy to use, easy to load and unload, suitable for heaps of different bikes and helps you save valuable floor space in your home or garage.
-

Maximize Your Space
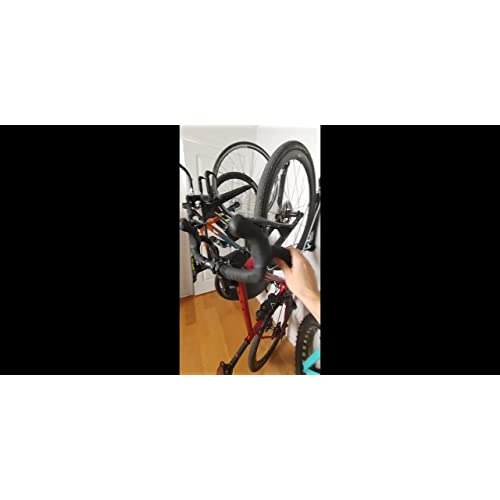
Steadyrack’s revolutionary design allows you to store your bike upright, off the floor and saves more of your valuable floor space. When the bike rack is empty, the arm simply folds away.
-

No lifting required
No need to lift and juggle your bikes, just balance your bike on the back wheel, push it in and allow the rack to do the lifting. An easy motion suitable for people of all ages and strengths.
-

Great value for money
Better bike storage means you can enjoy your space and your love for riding even easier. Millions of people all over the world trust Steadyrack because of how much easier it is to go riding.
-

Tires fit snugly and securely
Holds up to 77lbs/35kg, bikes with tire width between 2.8" - 5" inches fit snugly and securely.
-

Swivels up to 160 degrees
Steadyracks can be mounted vertically to almost any wall and will conveniently swivel up to 160 degrees, from side to side, allowing for significant space-saving advantages.
-

Built to last to keep your bike protected
Steadyracks are made with high-quality steel and plastic components which are designed to last a very long time when properly maintained, and won"t damage your rims or the bike frame.
-

Make going cycling easy
Unloading a Steadyrack is a breeze. Just grab your handlebars and pull. You’ll be out riding before you know it.
-

Fit more bikes into smaller spaces
For limited wall space, you can stagger the height of the racks to overlap your bikes, making Steadyrack the perfect option for apartments and small sheds.
-

Easy to install
Each Steadyrack comes with fixings included for timber or masonry (brick/concrete) installation and detailed instructions. Easy for anyone with minimal DIY knowledge to install.
Choose the correct Steadyrack for your bike.
 Steadyrack Fat Rack |  Steadyrack Fender Rack |  Steadyrack MTB Rack |  Steadyrack Classic Rack |  Steadyrack eBike Rack | |
|
Maximum Weight
| 77lbs | 55lbs | 77lbs | 77lbs | 77lbs |
|
Recommended Wheel Diameter
| 20" - 29" | 20" - 29" | 20" - 29" | 20" - 29" | 20" - 29" |
|
Maximum Tire Width
| 2.8" - 5" | Up to 2.4" | 2.1" - 2.8" | Up to 2.1" | 2.1" - 2.8" |
|
Works with Fenders
| ✘ | ✔ | ✘ | ✘ | ✔ |
|
Bike Type
| eBikes with "Fat" Tires | Bikes WITH Fenders, Time Trial | MTB, eMTB, Gravel | Road, Hybrid, Small MTB, BMX | eBikes WITH Fenders, Commuter |
Choose the setup that’s best for your space.

Save Wall Space - Staggered
Limited wall space? You can stagger the racks to overlap your bikes, with Steadyracks placed as close as 350mm (1ft 2in) apart. For mountain bikes or other wider handlebar bikes, racks should be placed 406mm (1ft 4in) apart. Great for apartments and small sheds.

Maximize Floor Space - Level
Maximize your floor space by hanging your racks at the same height and further apart. A minimum of 600mm (2ft) gap between the Steadyracks will allow for the optimum pivot range. For mountain bikes or other wider handlebar bikes, racks should be placed 813mm (2ft 6in) apart. Great for garages.