
Micro-Swiss All Metal Hotend Kit for Creality CR-10s PRO/CR-10 Max/Ender 3 V2 Neo
-

Tyler A.
> 3 dayMissing the neck to use it...I took the jump on this but Im returning it and wont be coming back
-
Terry Brown
> 3 dayInstalled by a friend who has way more experience doing this sort of thing. He said it was easy and it worked well.
-
Scott Rockwell
> 3 dayHavent used it yet, but it came with a sticker and that is awesome.. nobody gives stickers anymore. The hot end fits perfect and looks great. Thanks for the great part and the sticker!!
-
skatemaster231
> 3 dayIts a fantastic hotend and contrary to popular belief it wont cause problems when printing PLA, not if you get a good quality all metal one like this Micro Swiss. Super easy to install and the harden nozzle opens way more filament options not to mention youre no longer limited by the temp of your PTFE tube. I cant recommend this if you just print exclusively in PLA but if you want to tackle other high temp filaments, this upgrade is a no brainer. Remember to reduce your retraction to no more than 4mm and make sure you run the fan at all layers when printing with PLA and you wont run into any issues.
-
rjb
> 3 dayIt clogs so frequently that I have not been able to finish a single print with it.
-
Yoshisuke Kuramoto
> 3 dayI bought two of this kits. I bought the first one 6 months ago. Bcause the quality of the Chinese all-metal hot end I was using until then was poor. But last month, I broke the titanium throat when I tried to remove it from the heatsink to correct the angle of the hot end block. The cause was that the titanium throat was stuck to the aluminum heat sink. Heat resistant silicone paste should have been applied to the titanium throat and heat sink attachments. Amazon didnt sell only titanium throats and heatsinks, so I bought the second one as well. After that, the screw at the nozzle mounting part of the heat end block broke. The heat end block wasnt wasted. I use various filaments such as Nylon, Carbon filled Nylon, PC, Carbon filled PC, TPU, and TPE according to the purpose of the model. For this reason I change the nozzles frequently. I intended to be careful not to overtighten the nozzle, but the screw on the heat end block broken. I think this kit has very good performance, but this kit needs to be handled with great care.
-
C. Lane
Greater than one weekThis is a direct replacement for the factory hot end. Remove the old one, trim the bowdin tube square, pre heat the hot end before tightening the nozzle. Then print! This works really well.
-
Brian
Greater than one weekI wish I could give this hot-end a better review. It is very well made to say the least. That is why I gave it three stars. The hardware they supply is a little subpar. One of the screws that holds the hot end to the printer literally had no way to use it. It was perfectly round inside with no way for the allen key to grab it. I dont blame Microswiss for this as I doubt they make the hardware. I actually installed this hot end right after I made my first print with the original CR hotend. I followed the instructions to the letter. Used a torque wrench and followed some of the tips left in the comment sections. But I kept getting brittle prints and stringing issues. I tried various temps, and finally decided I wanted to try my original hotend once again. I had noticed on a couple prints that the tip would get a little goopy so to speak. So I would clean it off. It wasnt until I pulled the fan cover off to swap it out that I discovered there is a leak. and the whole hotend was covered in PLA. The heating element has literally welded itself inside the hotend. So I am not sure where it all went wrong... But it went wrong :p Ordered an original CR10s Pro hotend kit. This is mostly a hobby, and I doubt I will ever be printing exotic materials. If I do.... I shall revisit this hotend.
-
partime
> 3 dayThe real deal. Works great. One of my favorite upgrades on my CR10 MAX. Has no problem printing at .6 layers
-
C. Yeiser
> 3 dayAn all metal hotend is one of the first upgrades that should be done on creality ender series. The stock hot end has design issues and caned to clogging and serious leaking. This hotend can eliminate most of those issues if assembled correctly. Check YouTube for assembly and breaking info.


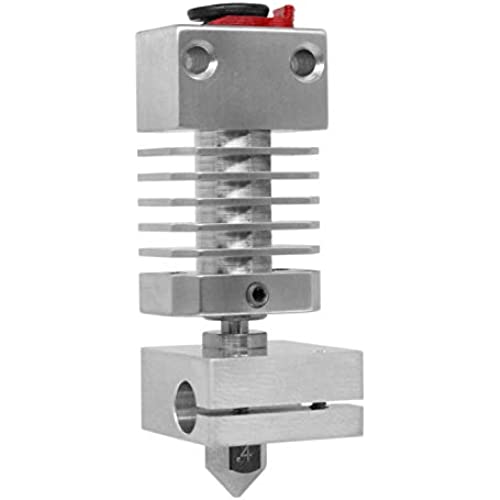
Micro Swiss All Metal Hotend Kit for Creality CR-10s PRO:
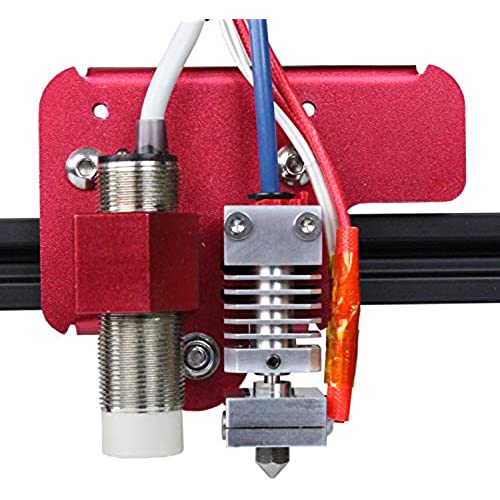
This is a drop in All Metal Conversion kit for the CR-10s Pro printers. It requires absolutely zero modification to your printer to install. Our uniquely designed cooling block eliminates need for a thermal tube. By not having a separate thermal tube inside the cooling block, it allows for faster heat dissipation. The thermal heat break is made from Grade 5 Titanium Alloy to provide excellent thermal isolation between the heater and the cooling block. Titanium is extremely strong material and offers almost 3x lower thermal conductivity than stainless steel, creating more defined meltzone.

Fits:
- Creality CR-10s Pro
- Creality CR-10 Max
- Ender 3 V2 Neo

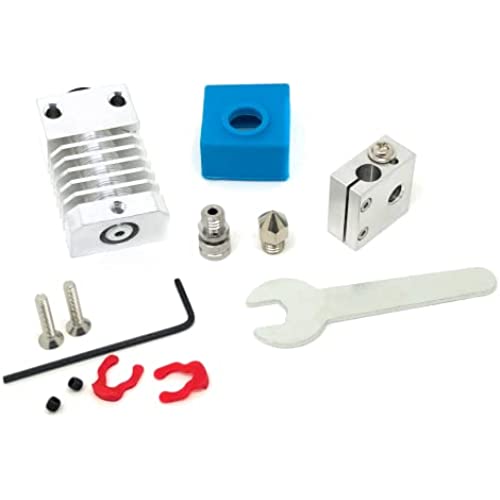
What"s in the box:
- Aluminum Cooling Block
- Grade 5 Titanium Heat Break
- Aluminum Heater Block
- Brass Plated Wear Resistant MK8 .4mm Nozzle
- Silicone Sock
- Hardware kit

|

|

|

|

|

|
|
|---|---|---|---|---|---|---|
| Micro Swiss MK8 Brass Plated .4mm Nozzle | Micro Swiss MK8 Brass Plated .6mm Nozzle | Micro Swiss MK8 Brass Plated .8mm Nozzle | Micro Swiss MK8 A2 Plated .4mm Nozzle | Micro Swiss MK8 A2 Plated .6mm Nozzle | Micro Swiss MK8 A2 Plated .8mm Nozzle | |
| Base Material | Brass | Brass | Brass | A2 Hardened Tool Steel | A2 Hardened Tool Steel | A2 Hardened Tool Steel |
| Plated | ✓ | ✓ | ✓ | ✓ | ✓ | ✓ |