
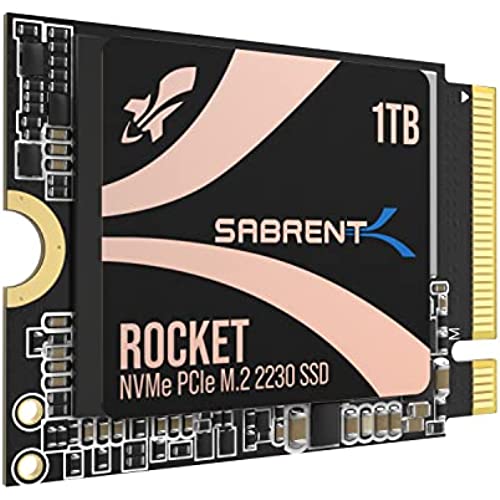
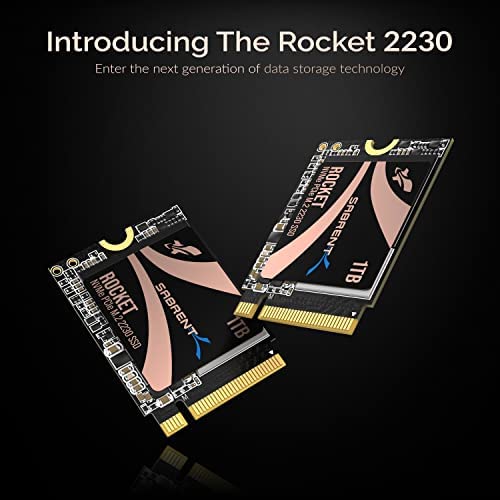
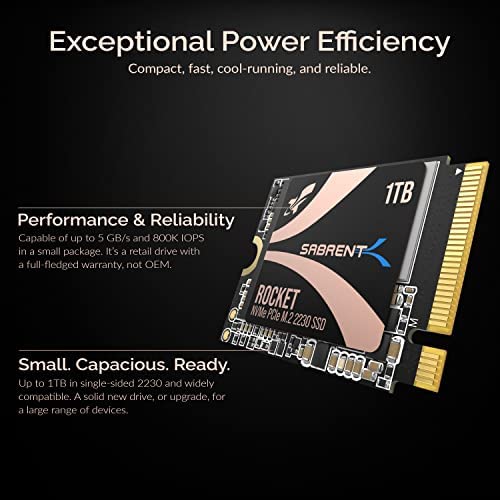

SABRENT Rocket 2230 NVMe 4.0 1TB High Performance PCIe 4.0 M.2 2230 SSD [SB-2130-1TB]
-

michael
Greater than one weekAt the time of writing its been working great in my steam deck for about 3 weeks now, would recommend
-
magis123
> 3 dayOk yeah Im that person, I picked this up for my Steam Deck and it served its purpose until the 2TB version came out and now that is in the Steam Deck ... but what to do with this? I put it in a small 2230 external drive case and it is now my Windows 10 Boot partition when I want to boot my Steam Deck into Windows. It is sufficiently fast for the tasks it does, temps are reasonable (never really above like 65*C) and it just works. Sabrent knocks it out of the park once again.
-
eglou
> 3 daySo i bought this ssd for my steam deck and it works like a charm. Just to remind you that when you replaced the original internal ssd you need to reinstall the steam os. And theres a lot of tutorial in youtube that you can watch so dont worry. Once you finished all the setup you will be very happy that you decided to choose the 64gb and saves bunch.
-
Sumit
> 3 dayThe packaging of this product is really good. The first shipment was lost so they shipped me a second one. It comes in a compact metal box, which is not much bigger than the SSD itself. Very well protected for shipping. The overall performance of the SSD is excellent, but I would expect it for the price it comes in and the brand. It will be a spare one for me at this time since I already have another M.2 SSD installed on my lenovo. Initial tests indicate its high performance. Overall love it. PS I have a mini-PC and will install it there soon.
-
Ben B
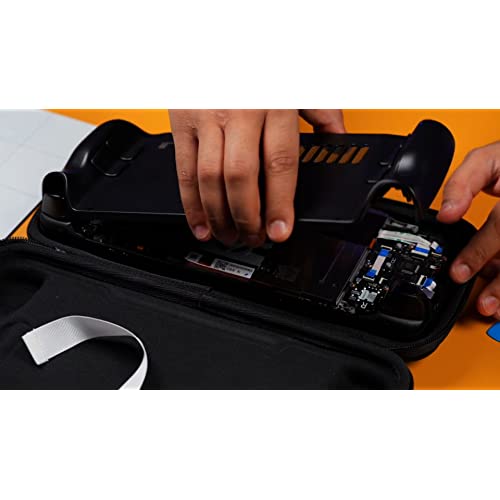
> 3 dayI had read a lot of horror stories about upgrading the M.2 NVMe drive on the Surface Pro 8 (SP8). There were a lot of stories about overheating and BSOD when trying to re-install Windows. When I saw this Sabrent drive advertised on Amazon it specifically said Surface Pro compatible and that it ran cool, so I took a chance on it. I am very pleased with the result. Ill do the TL;DR part up front: I upgraded my 256GB M.2 Drive on my Surface Pro 8 with the 1 TB Sabrent Rocket 2230 NVMe M.2 drive, and the drive runs great at PCIe 4.0 Speeds according to CrystalMark 8. No BSOD and runs under 50 Celsius *EDIT*: Under maximum load, about 35 degrees celcius degrees idle/normal operations *END EDIT* according to CrystalDiskInfo 8. I was able to copy all of my files using Acronis partitioning software you get to use free from Sabrent when you purchase their drive. If you want to know exactly how I copied everything over without ever having to go into the BIOS, keep reading: UPFRONT DISCLAIMER: You will need to purchase three things to do this upgrade if you dont have them already. Two of them you would need anyway if you were to upgrade like Microsoft suggests: #4 Torx screwdriver/bit, thermal compound, and an external NVMe drive enclosure. 1) First I did purchase an external NVMe enclosure to copy the old drive to the new one. You can find them on Amazon for under $30 US. You need to make sure the enclosure can take 2230 size drives. I got one that had USB C to USB C cable and was thunderbolt compatible. Another consideration is that after you swap the NVMe drives you can use the enclosure with your old drive and have another high speed hard drive to back stuff up on, although I found you will need an NVMe thermal pad/heatsink for the old drive or it can overheat. 2) After reading about BSOD NVMe upgrade horror stories on the SP8 it lead me to articles talking about AHCI Link Power Management - HIPM/DIPM. HIPM/DIPM power management is not on by default and you actually have to do a Windows registry edit to make it available. There are some good guides on how to do this via a quick google search. I recommend you enable it and turn the feature on. 3) I had to disable drive encryption before copying files over (it is on by default). You can either disable encryption or get a USB encryption key. I chose to decrypt the drive which will take hours depending on how much data you have on the drive. You can re-encrypt once everything is over to the new drive. THIS NEXT PART IS WHERE MOVING FILES OVER AND GETTING WINDOWS SETEP ON THE NEW DRIVE DIFFERS FROM WHAT MICROSOFT WANTS YOU TO DO. 4) I cannot stress enough the kudos to Sabrent for having their own disk partition software. Acronis, which you can get from Sabrents website, will copy all of your files over for you verbatim; no reinstalling necessary. Follow the disk cloning prompts, and the best part is it will automatically increase the size of your main windows drive to maximum while keeping your boot partition and recovery partition intact (just make sure you chose the correct cloning prompt). Acronis alone makes it worth it to go with Sabrent. 5) The SP8 comes with a front and back metal sleave for the NVMe drive. YOU WILL NEED a #4 Torx screwdriver bit (very tiny!) to unscrew the drive and screw it back in. The metal casing snaps off (do so gently so as not to bend the casing). I cleaned off the thermal compound the old drive had, put in the Sabrent drive, re-applied some CPU thermal compound I already had, and put the casing back together, then screwed it back into the SP8. A lot of videos show using a thermal pad instead of re-using the Microsoft drive enclosure. I think the drive enclosure helps distribute heat evenly back into the SP8 chassis. I turned the SP8 on and it recognized me with all of my files intact without ever having to go into the BIOS the first time. I have been running normally for almost two weeks and not a single issue. Drive runs cool and fast. Works great and couldnt be happier. I hope this helps you out if you are on the fence!
-
Andy
> 3 dayUpdating my review of this card. At first it works great with solid write speeds and solid read speeds. However, after sustained writes and reads, the card overheats and drops to around 40MB/s write rates, which is utterly useless to me.
-
justin t.
> 3 daywas super easy to install into steam deck. hardest issue was not stripping the steam decks screws they must be made with some sort of butter. word of advice if anyone is putting this into the steam deck. the steam deck screws to the back shell are SELF TAPPING. so do not over tighten them or you will strip them out. the screws the selves are like butter as well and one even came pre stripped from factory. the hard drive works as it should. was silly easy to install after getting the back cover off. if you are pealing the cover off like i had to with out a plastic shim start pealing it awake from the vent fan as its very easy to get fingers in that. DONT FORGET TO USE THE IFIX IT WEBSITE TO SHOW HOW TO DO IT. MAKE SURE TO DISCONNECT BATTERY!
-
Felspawn
> 3 daySABRENT provides a great how to video. the process itself was childs play. the Drive works flawlessly, performance is much faster then even the quickest SD card (as youd expect). Storage related stutters i was experiencing in some games have disappeared.
-
Slasher2324
> 3 dayWorked great on my 64GB SteamDeck.Replace 1tb SSD i Received Original packaging. Great product that was easily installed. Working great so far!
-
GetFitWithJared
> 3 dayI picked up a 64GB Steam Deck as I figured it was a fantastic price and I was planning to just install everything to SD cards. Thats worked fine for about 6 months, but I noticed that Steam has swap files that fill up that 64GB drive over time and before I ran into issues, I decided to pop the original drive out and put a bigger drive in. When I ordered this drive, it was on sale for $90, cheaper than the price difference between the 64GB and 256GB Steam Decks and twice the storage. The install itself was easy enough, just follow the iFixit guide, and I liked that the Sabrent shipped in a padded metal sleeve that allows me to protect the original drive as well in case I need to send it back for warranty work.


SABRENT Rocket 2242 / 2230 NVMe SSD M.2
 ROCKET 2230 NVME 4.0 1TB |  ROCKET 2230 NVME 4.0 512G |  ROCKET 2230 NVME 4.0 256G |  ROCKET 2242 NVME 2TB |  ROCKET 2242 NVME 1TB |  ROCKET 2242 NVME 512GB | |
|
SIZE
| 2230 (30X22mm) | 2230 (30X22mm) | 2230 (30X22mm) | 2242 (42X22mm) | 2242 (42X22mm) | 2242 (42X22mm) |
|
DIGITAL STORAGE CAPACITY
| 1TB | 512GB | 256GB | 2TB | 1TB | 512GB |
|
COMPATIBLE WITH STEAM DECK
| ✔ | ✔ | ✔ | ✘ | ✘ | ✘ |
|
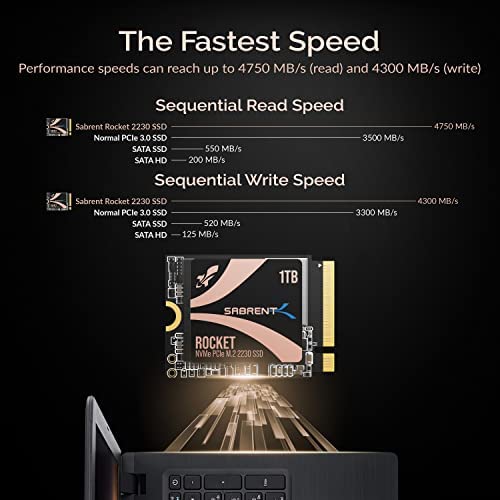
READ SPEED
| 4750 MB/s | 4750 MB/s | 4750 MB/s | 1700 MB/s | 1700 MB/s | 1700 MB/s |
|
WRITE SPEED
| 4300 MB/s | 4300 MB/s | 4300 MB/s | 1550 MB/s | 1550 MB/s | 1550 MB/s |