
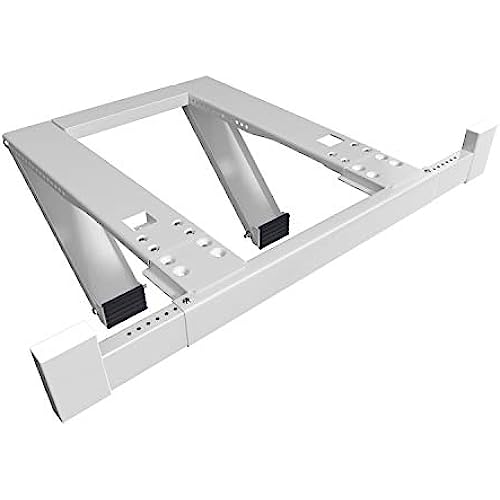
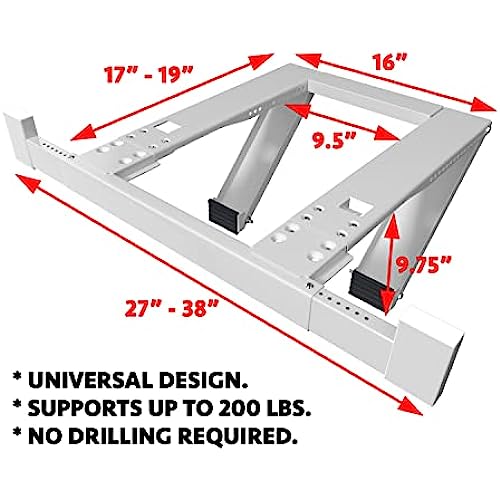

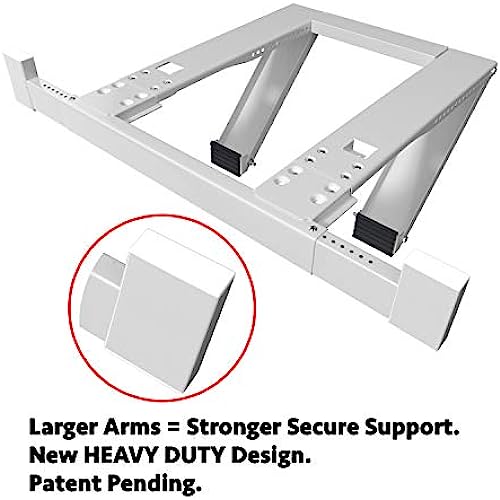
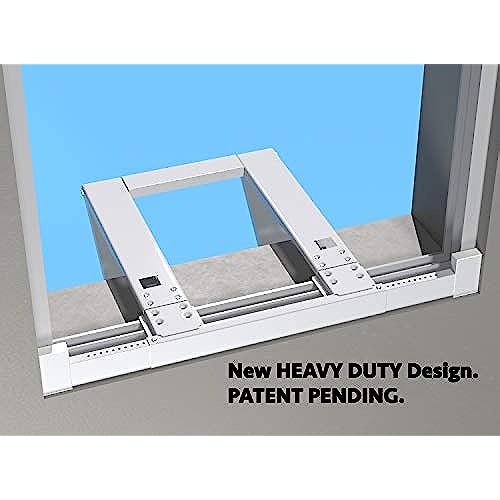
Alpine Hardware Premium Heat Pump Drillless Drill-Less Window Air Conditioner & Heat Pump Bracket - Window AC Support - Supports Air Conditioners Well Over 200 lbs. - No Drilling 2023 Model
-

Mike
Greater than one weekThe thing you got to know before puchasing is what ac you get and try picture how its going to sit on this unit its completely flat. Make sure your ac is also flat on the bottom, wise your going to need to add with this like wood or something like that. Mine wasnt obviously.
-
M. Ives
> 3 dayThis worked out great for me, mostly! I did not want to drill holes into my window frame to install an AC unit that I would be taking out again in the Fall so I purchased this support bracket. I also wanted to make sure that the AC unit did not fall from my 2nd story place and hit someone. It worked great, with a few notes: 1. The assembly part was a bit tricky for me as you have to install legs in a certain direction and I missed that part of the instructions but it was easy enough to undo and fix. 2. Also, it was hard to seal the air gap left in between the bracket and where the AC unit rests on it. This is not covered in any instructions I researched, including their online video. It might work better if you have two people to install the AC so you could drop it on top of some insulation you install on the bracket. I was sliding the AC onto the bracket myself so that didnt work for me. I used some painters tape to try to seal up the gaps that I could reach and it was fine for the summer. 3. I also had a problem when I removed the bracket for the Fall- it peeled off a bit of paint where the feet were resting against my outside wall. I covered the feet with painters tape in hopes that it will not do it again next year. With those notes, I would definitely recommend this support bracket for anyone who wants more support for their Window AC unit, especially if you do not want to have to drill holes in your house. I was able to install a 60lb AC unit by myself and not have to worry about dropping it during the process.
-
AndrewA
Greater than one weekThe hardest part about installing this bracket was drilling the holes - but that was because of how I installed it. I wanted my AC unit outside of my window, so I could still shut the window. I did this by creating a plywood baffle that I could insert inside the recesses for the screen. I removed the screen, put the baffle in, then used putty tape to seal it up around the edges. To mount the AC unit and bracket this way, meant I had to drill and mount the bracket on the outside brick/block sill of my window. So with some research, I settled on using some carbide bits to drill with, and special blue anchor screws. I quickly found that: a) you want to drill the block dry b) you want to periodically use canned air (or a compressor) to blow out the hole as it fills with dust If you dont do those steps - you end up with the drill only going so far, then not going any further. So drill, blow out the hole, drill some more, etc - until you get to the depth needed. But other than that difference, I followed the instructions just as they were written, and things went together really well and fast. Ive had the bracket up for about 2 weeks now, and it works great. It only took a couple of hours to install (I took my time, as I didnt want to mess up the block), then a few more to make the baffle (a week or so later, I caulked it, painted it, then re-installed it properly - but I did use it for a week without all of that). The only other extra thing I did was add a couple of L-brackets to the holes, to keep the unit from potentially sliding backwards. Overall, the install turned out great, and Im very pleased with the product.
-
Goat girl
> 3 dayIf youre going to have a window AC unit, you probably need a bracket. This one seems very sturdy for its size, and is doing the trick in holding up my AC. Its not as easy to install as a simple 1-2-3 and there it is. It requires a drill and some technical expertise. Also, in order to fit snugly against the outside wall, you may need further bracing with wood wedges or similar (the shape of my exterior wall required two nearly 3 blocks to achieve level). Read the instructions through before starting installation. You dont want to get stuck halfway through the job with nothing in the open window! I had help from my dad, who thankfully knew better than to start hanging the bracket without taking measurements and cutting the necessary wood wedges (not included!). The integral levels in the arms are really useful to make sure that your AC unit tilts very slightly to the outside and drains away from the window. Once screwed in place, I assume that the bracket will be staying permanently, although Ill put the AC in storage come winter.
-
UsuallyMe
> 3 dayGood idea but couldnt use because the lower rail (holds the accordian sides) on the a.c. unit has to fit in the window groove. With this brace it raises it way above where it should naturally fit.
-
LJN
> 3 dayI live in an RV. I CANNOT DRILL INTO MY WALLS. This support is perfect for RVs.
-
Cawfee
> 3 dayI have used the one leg and this version. Installed a large 18.000 BTU unit with this item. Not too many parts, decent directions. I had to fiddle with the settings to get it right (VERY weird customer window so harder). Best part was the level-allowed me to gauge EXACTLY when i got everything right. Before the AC unit went in, I hung my 165 pound body on this to show my customer how strong it is. Dont screw around, an AC can break the glass in a window, and/or bend or warp your window. Instead place it on this support. It will protect your window from rot (same customer had wood under their last unit-this job included rebuilding the window ledge). The outside foot will protect most house cladding-even cedar shakes. Ill never install a window unit that weighs more than 45 pounds without the one arm or two arm version. Check your ac unit weight and buy one of these. It will look professional. (I am a Home Improvement/maintenance contractor).
-
Pro-vaxxer
> 3 dayWe don’t assemble stuff very often so this took us a while. We used the written directions along with the online video. You need both. The first step where you attach the brackets is misleading because you should anticipate that they will need to be unscrewed and repositioned to get the angle right. That takes time and tinkering to figure out where they should go. But once you get it right this is a nice piece of engineering. Tension holds it in place and creates a sturdy shelf for the air conditioner. But also be prepared for a big gap at the bottom. It needed to be stuffed with 2x1 inch foam (the black part in the picture). We also used side panels to help cover the sides and to stuff any smaller gaps. Once it is put together we won’t have to do it again and installing the air conditioner in the future will be a breeze (pun intended).
-
Kindle Customer
> 3 dayInstructions/Video needs to be redone. I struggled to get the nuts on in the cramped space in the order the video gave until I changed the order in which I put things together. It tells you to put the arms then take it apart again THEN measure then redo all of the steps. So it was very frustrating to struggle to put it together only to have to take it apart. Other than that it works great!
-
Topher G.
> 3 dayThe brackets are sturdy-ish, and the hardware isnt the highest grade. But what can you expect for this price? For what it is, it does the job and does it well. Although, install was a little bit confusing due to the poorly translated instructions. I mean, you shouldnt really need to rely on the assembly directions 100% because most can look at it and see whats going on. But I found myself scratching my head a few times after reading the instructions and trying to interpret what it is exactly they want me to do. To mount to the sill, I had to utilize my own hardware, because the provided hardware stripped out (big Phillips head screws for securing to sill plate) after one attempt to drive it into a pre-drilled hole. So, to sum up; -good brackets -not so good hardware -unclear instructions -reletively easy to install despite instructions -sturdy -versitile (comes with adapters to help install over larger sills) If you use your own hardware (to mount to sill only, assembly hardware is OK) then youll be happy with this product. They just need to throw in 2 different sill mounting screws that are a different type of drive (think Allen or Star bit; something less suseptable to stripping) then this will be a 100% solid kit.


These 4 Options Need Drilled into the Window Sill
|
|
|
|
|
|---|---|---|---|
Light/Med Duty 1 ArmThis supports up to 85lbs and is a light/medium duty 1 arm bracket. |
Heavy Duty 1 ArmThis supports up to 160lbs and is a heavy duty 1 arm bracket. |
Light/Med Duty 2 ArmThis supports up to 105 lbs and is a light duty 2 arm bracket. |
Heavy Duty 2 ArmThis supports up to 180lbs and is a heavy duty 2 arm bracket. |


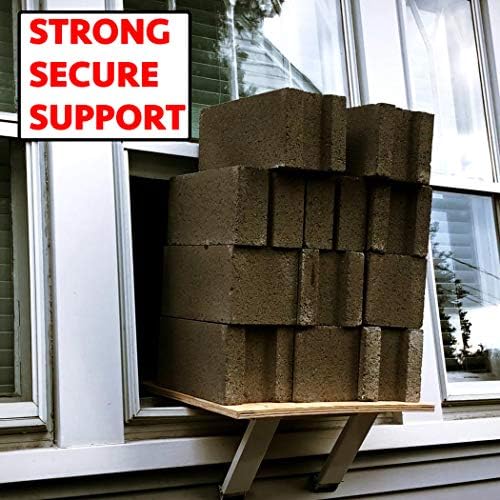
Drill-Less Support Option
This supports well over 200lbs and is a heavy duty bracket that is Drill-Less. This means it does not need drilled into the window sill.

|

|

|

|

|
|
|---|---|---|---|---|---|
| Outdoor Window Air Conditioner Cover | Indoor Window Air Conditioner Cover | Single Arm Air Conditioner Bracket | Double Arm Air Conditioner Bracket | Drill Less Double Arm Air Conditioner Bracket | |
| Options Available | 15" x 21" x 16" | 17" x 25" x 21" | 19" x 27" x 25" | 17" x 13" x 3.5" | 21" x 13" x 2.5" | 25" x 16" x 3.5" | 28" x 20" x 3.5" | Light Duty (85lbs) | Heavy Duty (160lbs) | Light Duty (105lbs) | Heavy Duty (180lbs) | Heavy Duty Drill-Less (200+ lbs) |
| Material | Heavy Duty Polyester | 210 PU Polyester | Metal | Metal | Metal |
| Season | Fall/Winter | Fall/Winter | Spring/Summer | Spring/Summer | Spring/Summer |